
SuperSpec

Wednesday, 31 August 2016
Rear Number Plate Revisited

Sunday, 28 August 2016
Stamford Car Show

Took her to the Stamford Car Show today. Managed to get 7
other hoods along as well. And first outing of my new Club
Banner.
 It seems it rained everywhere in Lincolnshire except in
the middle of Stamford. My reputation for laying on good weather
for Robin Hood Lincolnshire events was even more enhanced Although she got
filthy on the way home with all the puddles.
It seems it rained everywhere in Lincolnshire except in
the middle of Stamford. My reputation for laying on good weather
for Robin Hood Lincolnshire events was even more enhanced Although she got
filthy on the way home with all the puddles.
We were positioned between the Corvette Club and the Italian Replicas Club


We were positioned between the Corvette Club and the Italian Replicas Club
Wednesday, 17 August 2016
Reposiion Tyre Pressure Gauge and Voltmeter
Decided it was time to let the central power socket revert to being a phone charger.
 so moved the Tyre Pressure Monitor to the top right of the dash and also put a voltmeter in just underneath it.

Sunday, 14 August 2016
Third Brake Light
Having put the daylight running lights at the front, time to look
at the back. Most cars now have the high-level 'third' brake
light so time to join them. Love it !!

The wires go through the tube so they are hidden. Thanks goodness for Ruth's crochet hook
Later: A friend pointed out that by mounting it on top of the roll bar I couldn't use the wet weather gear.
 Simple answer was to remount it underneath the roll bar.

The wires go through the tube so they are hidden. Thanks goodness for Ruth's crochet hook
Later: A friend pointed out that by mounting it on top of the roll bar I couldn't use the wet weather gear.

Saturday, 6 August 2016
Redesigned Rear Number Plate
A bit of cosmetic work this morning.
 I love the 'Tiger' spare wheel cover, but the
design of the rear number plate meant that the bottom half of it
was obscured.
I love the 'Tiger' spare wheel cover, but the
design of the rear number plate meant that the bottom half of it
was obscured.
 So I removed the luggage rack as I use it only a couple of times a
year, and it was out with the grinder, drill and riveter and after
an hour or so we now have this:
So I removed the luggage rack as I use it only a couple of times a
year, and it was out with the grinder, drill and riveter and after
an hour or so we now have this:
Much better. I may look at dropping it a bit more but I ran out of time today.

Much better. I may look at dropping it a bit more but I ran out of time today.
Friday, 5 August 2016
More on the Cooling System
Interesting experiment today. Having fixed all of the cooling
system so that she runs at just over 90C, with the fan kicking in
at about 95C and stopping at 90C she is now a pleasure to drive
and I don't have to keep checking the temperature gauge. But the
only 'niggle' was that she was taking quite a long time to warm up
to temperature.
 Here is a screen shot from a couple of weeks ago
and you can see it took almost 12 mins to get to 80C
Here is a screen shot from a couple of weeks ago
and you can see it took almost 12 mins to get to 80C
The general consensus was that this was caused by a rather odd design of the cooling system by the designer. He had taken a pipe that went to the heater in the original Rover design and taken it across the top of the engine. via a stainless steel pipe, to the top of the radiator. None of us could figure out why he did that except that it helped prevent air locks when you were filling the system via the expansion bottle. The problem is that meant there was always a circulation through the radiator even when the thermostat was closed.
 So now i am in the position where I don't need to refill the
system (Last time I added any water was back in 2015) I decided to
try removing the pipe and see what happened. In good kit car
fashion I just blocked the hose with a 'widget' made from 18mm
dowel.
So now i am in the position where I don't need to refill the
system (Last time I added any water was back in 2015) I decided to
try removing the pipe and see what happened. In good kit car
fashion I just blocked the hose with a 'widget' made from 18mm
dowel.

And even I was surprised by the result. Here is a screen shot from today's trip:

The general consensus was that this was caused by a rather odd design of the cooling system by the designer. He had taken a pipe that went to the heater in the original Rover design and taken it across the top of the engine. via a stainless steel pipe, to the top of the radiator. None of us could figure out why he did that except that it helped prevent air locks when you were filling the system via the expansion bottle. The problem is that meant there was always a circulation through the radiator even when the thermostat was closed.


And even I was surprised by the result. Here is a screen shot from today's trip:
This time it was less than 5 minutes to reach 80C. More than twice
as fast as before. A dramatic improvement, so from now the pipe
stays off the car.
I shall probably carry the pipe and a screwdriver around for the
next few trips just in case there are any unintended consequences,
and I need to find a better solution than the dowels to block the
pipes as they are not 100% watertight. I guess a rubber plug would
be better. We'll see if the Club have any suggestions.
Later: Now fitted some much nicer aluminium bungs

Later: Now fitted some much nicer aluminium bungs

Thursday, 4 August 2016
Hot Exhaust
One of the disadvantages of the external exhaust system is it makes getting out of the car a bit dangerous. At least with the Superspec it is the passenger who gets burnt and not the driver (other Robin Hood models tend to have the exhaust on the other side,
 But after the latest casualty I decided it was time to fit this. Hopefully it will prevent any further problems.

Tuesday, 2 August 2016
MOT
Feeling rather pleased with myself. She just sailed through the MOT with no advisories.
Quite chuffed, as I have put a fair amount of effort this year in making sure everything was right. Apparently the MOT chap was very impressed with my indicator notification system (high intensity LED and industrial strength buzzer), said it was the best he had seen on a kit car.
I was slightly worried about the noise level as the exhaust is a bit noisy, but apparently all he said was "sounds like a real sports car".
And the big test, of course, was the emissions check, where she has either failed or been marginal for the last few years. Well it exceeded all my expectations. CO2 was 0.018 (max allowed 0.2), HC was 23 (max allowed is 200) and the lambda sensor was 0.999 (range allowed is 0.97-1.03, perfect is 1.0) which is as close to perfection as I could ask.
Now that everything works properly I can go back to cosmetic tinkering , having eased off a bit after I had got her ready for the MOT.
Quite chuffed, as I have put a fair amount of effort this year in making sure everything was right. Apparently the MOT chap was very impressed with my indicator notification system (high intensity LED and industrial strength buzzer), said it was the best he had seen on a kit car.
I was slightly worried about the noise level as the exhaust is a bit noisy, but apparently all he said was "sounds like a real sports car".
And the big test, of course, was the emissions check, where she has either failed or been marginal for the last few years. Well it exceeded all my expectations. CO2 was 0.018 (max allowed 0.2), HC was 23 (max allowed is 200) and the lambda sensor was 0.999 (range allowed is 0.97-1.03, perfect is 1.0) which is as close to perfection as I could ask.
Now that everything works properly I can go back to cosmetic tinkering , having eased off a bit after I had got her ready for the MOT.
Monday, 18 July 2016
New Tyres All Round
As we approach MOT time I thought it was time to replace the tyres. In actual fact the front
2 were pretty marginal while the back 2 were OK. But they must
have been at least 15 years old so had gone very stiff and I
decided to replace all 4 of them. Also, although the car can
still be moved one-handed (a good indicator the tracking is OK),
both the front tyres were worn on the outside, so I think I might
get the tracking professionally checked anyway.
 It's very subjective but she did feel better on the way home, a
bit less lively than before. But it wasn't really a decent test
as, contrary to my instructions to set them at 18psi, they had put
them at 23psi. So I need to do another test run at 18psi
(19-20psi when warmed up)
It's very subjective but she did feel better on the way home, a
bit less lively than before. But it wasn't really a decent test
as, contrary to my instructions to set them at 18psi, they had put
them at 23psi. So I need to do another test run at 18psi
(19-20psi when warmed up)
Also, they had a deal on where they would do a 28-point safety check for free, so I took advantage of that. I do check her regularly but it never does any harm to have a second pair of eyes checking me. I was very pleased when they came up with only 3 comments:
1. The sump is leaking (safety ?) They had guessed why as they had quite a problem getting the car into one of the bays.
2. One of the exhaust pipes was blocked (safety?) I explained about back pressure, not sure they were convinced.
3. One of the rear brake pipes was touching the chassis.
So just the third one to have a look at. The original builder can take a bow
They also advised a brake fluid replacement, which is fair enough, as the recommendation is to change it every 3 years. Might get that done. Could do it myself, but at £35 I might let them do it.
First time I have seen her up on the lift so took the opportunity to have a good nose around. Interesting.

Also, they had a deal on where they would do a 28-point safety check for free, so I took advantage of that. I do check her regularly but it never does any harm to have a second pair of eyes checking me. I was very pleased when they came up with only 3 comments:
1. The sump is leaking (safety ?) They had guessed why as they had quite a problem getting the car into one of the bays.
2. One of the exhaust pipes was blocked (safety?) I explained about back pressure, not sure they were convinced.
3. One of the rear brake pipes was touching the chassis.
So just the third one to have a look at. The original builder can take a bow
They also advised a brake fluid replacement, which is fair enough, as the recommendation is to change it every 3 years. Might get that done. Could do it myself, but at £35 I might let them do it.
First time I have seen her up on the lift so took the opportunity to have a good nose around. Interesting.
Thursday, 16 June 2016
A Bit Over The Top ?
Like everyone these days I now have too many things to push into the cigarette socket.
 So bought this. I now have a realtime display of Tyre Pressure, Tyre temperature, Battery voltage, Cabin Temperature and FOUR USB Charging Points. Bit too easy to steal so will have to remove it when I park the car up.

Wednesday, 15 June 2016
Indicators Again
Weather still not good enough to take her out so had to tinker.
Despite the industrial strength buzzer coupled to the indicators I
still find I drive for miles with the indicator on if I am on a
long journey and listening to a podcast on my headphones. The
basic problem is that the old-style warning lights just don't show
up in bright sunlight.
 So as a temporary test I have added a
strip of high power LEDs that I had lying around.
So as a temporary test I have added a
strip of high power LEDs that I had lying around.
I will also check out a single 'ultra bright' LED (£1.79 on E-Bay) and see if that works. If the strip is better I'll get some nice green ones and do a better design, probably tucked up underneath the scuttle.
Might even look at replacing ALL the warning lights with LEDs when I do the complete redesign of the dash (winter project).

I will also check out a single 'ultra bright' LED (£1.79 on E-Bay) and see if that works. If the strip is better I'll get some nice green ones and do a better design, probably tucked up underneath the scuttle.
Might even look at replacing ALL the warning lights with LEDs when I do the complete redesign of the dash (winter project).
Saturday, 4 June 2016
Cooling System Complete
I think we can finally put the cooling system to bed. Here is a
plot of the trip up to GBS.

Job done !
GBS Open Day
Had a great run up to the Great British Sports Car factory.
 Went
the back roads so it was an hour each way. Lots of mates there
and cars there so had a happy 2 hours
chatting, admiring cars, doing emergency repairs to one of the
cars, drinking coffee and eating cake (lovely )
Went
the back roads so it was an hour each way. Lots of mates there
and cars there so had a happy 2 hours
chatting, admiring cars, doing emergency repairs to one of the
cars, drinking coffee and eating cake (lovely )

This time I used the tyre sensors and pumped the tyres up to19psi. During the trip I was interested to note that they fairly quickly warmed up and settled at 20 psi for the front and 22 psi for the back for the whole of the rest of the day. It's very subjective, but I really did feel that the ride was a lot smoother and less shake, rattle and roll, but this was a different set of roads to my last trip so it may not be a valid comparison.
However, it does
show I have probably been driving around on under-inflated tyres for
3 years because I believed the Halfords gauge.
About half way
there I flicked to the 'Tyre Temperature' display and found that the
two front tyres and the offside rear had settled on 19C which is
nice. Unfortunately the rear nearside was 3C hotter than the
others. And this differential was maintained all the trip. I was
coming up with all sorts of reasons (rubbing brake, tight wheel
bearing...) until one of the lads pointed out that the exhaust gases
were coming out just in front of that wheel so the sensor was
probably being warmed by that
I think I will file Tyre Temperature under 'things about the car I
would rather not know).
Friday, 3 June 2016
Tire Pressures
I Initially thought these were going to be fitted 'just because I could', but actually they might turn out to be very useful.
 First you replace the dust caps on the wheels with these:
 Then plug this into the power socket
And there you have a reading of the tyre pressures (and the tyre temperatures if you press the button on the side to switch displays).
Interestingly I had checked the pressures 2 days ago and they were all reading 20 psi on my normal gauge which is just a bit above the recommended pressure. As you can see, this system thinks they are 16 psi on the left and 15 psi on the right. So tomorrow I will to blow them up a bit until I get 18 psi all round and see if it makes a difference on my trip to the Great British Sportscars Open Day (free coffee and cake ).


And there you have a reading of the tyre pressures (and the tyre temperatures if you press the button on the side to switch displays).
Interestingly I had checked the pressures 2 days ago and they were all reading 20 psi on my normal gauge which is just a bit above the recommended pressure. As you can see, this system thinks they are 16 psi on the left and 15 psi on the right. So tomorrow I will to blow them up a bit until I get 18 psi all round and see if it makes a difference on my trip to the Great British Sportscars Open Day (free coffee and cake ).
Thursday, 26 May 2016
Mileage Limit Exceeded
For the first 3 years of owning the car I had an Insurance Policy with a 3000 mile/year cap. I thought that was more than enough. Unfortunately not so. This year, with 6 weeks to go to the end of the Policy, I had only 100 miles left. Luckily a quick call to the Insurance Company and £30 on my Credit Card and I had another 1000 miles added. Now to make the most of them.
Saturday, 21 May 2016
Air Filter
When he was building her the original builder had the sense to bring the air
filter forward into the nose cone instead of attaching it direct
to the throttle body. That meant she was getting nice clean air
instead of the hot, dirty air from the back of the engine (This
engine was originally designed to be transverse, across the car,
so in that case the air filter was already in front, in clean
air).
This worked well, but all he had available at the time was an 80cm diameter tube and the throttle body diameter was 70cm. So it has been 'scrunched' up to fit. I had always intended to replace it and some 70cm tube arrived while I was away. So fitted that this morning.
I had also recently realised the air filter was the original one from 2008, whereas they are normally replaced every couple of years, so decided to treat her to a new one at the same time. Bought a universal one to fit any tube between 65 - 80mm and fitted that

Took her out for a quick run to make sure she was breathing OK. Didn't expect to see much difference. Boy was I wrong. Absolutely amazing transformation. She's always been fast, but I found it next to impossible to keep to the speed limit. Just a slight pressure on the pedal and she leapt forward like a scalded cat and I was passing 70.
Engine unbelievably
crisp and growling beautifully, revving so much more freely than
before.
Who would have guessed a new air filter would have made that much difference ? Am now thinking that I should split the pipe in two and use half of the 80mm pipe at the front as the filter will still fit. That would act as a ram air system and force more air into the engine. A very cheap supercharger
Who would have guessed a new air filter would have made that much difference ? Am now thinking that I should split the pipe in two and use half of the 80mm pipe at the front as the filter will still fit. That would act as a ram air system and force more air into the engine. A very cheap supercharger
Monday, 9 May 2016
Windscreen Wipers again
At this blog post I described how I swapped the windscreen wipers over so I had an 8" blade on the drivers side and a 7" blade on the passenger side. But it was still not ideal and I really needed a couple of 9" blades. But that
size blade with the correct mounting fit (7mm bayonet for those
interested) were just not available anywhere. Closest I could get was
10" blades, actually off a Bentley But they were only £6 each so I bought a pair with the intention of chopping of 1/2" from each one.
 Fitted the driver side one and had a pleasant surprise, it actually
sweeps beautifully and just misses the top of the windscreen. So no
need to trim it.
Fitted the driver side one and had a pleasant surprise, it actually
sweeps beautifully and just misses the top of the windscreen. So no
need to trim it.
 But it turned out that I couldn't fit a new blade on the passenger side
as it clashed with the driver one in the park position. So I now have a
10" blade on the drivers side and a 7" blade on the passenger side.
But it turned out that I couldn't fit a new blade on the passenger side
as it clashed with the driver one in the park position. So I now have a
10" blade on the drivers side and a 7" blade on the passenger side.
Which is fine. Perfectly legal and I never carry a passenger in the rain anyway.
And I also have a spare wiper blade now:-)


Which is fine. Perfectly legal and I never carry a passenger in the rain anyway.
And I also have a spare wiper blade now:-)
Friday, 6 May 2016
Bonnet Louvres
Now the temperatures are warming up and the engine is running at a
proper temperature I found I was sweltering when I got back from a run
yesterday, the temperature in the cabin was showing 32C !!
So time to give the hot air somewhere else to go apart from up my trouser legs and I have at long last fitted the louvres to the bonnet.

I'll have to see what effect they have, if any. Meanwhile they look rather good
But that was the LAST thing on my ToDo list, what do I do now ?
So time to give the hot air somewhere else to go apart from up my trouser legs and I have at long last fitted the louvres to the bonnet.

I'll have to see what effect they have, if any. Meanwhile they look rather good
But that was the LAST thing on my ToDo list, what do I do now ?
Wednesday, 4 May 2016
Grill Guard
Although I have never had a stone damage the radiator, it was probably only a matter of time as the grid is very open. So having seen a lot of the cars at Stoneleigh that had mesh guards I decided it was time.
 So a quick purchase on E-Bay, cut it to shape with the angle grinder, attached with cable ties and now she is properly protected.
Smart !

Smart !
Spare Wheel Cover
Having been instrumental in helping a friend buy another Superspec car l asked if I could have his spare wheel cover.
 The car has always been known as the 'Tiger' so this was too good to miss :-)
The problem is the number plate obscures most of it, so I need to redesign it to use a single line plate.

The problem is the number plate obscures most of it, so I need to redesign it to use a single line plate.
Saturday, 23 April 2016
Windscreen Wipers
Although I try not to drive in the rain, I do get caught out. And on occasions the air is damp and the windscreen mists up so I have to use the wipers.
 And
I have found that there is a large gap between the top of the wiper and
the top of the screen, just at my eye-level, so I either have to hunch
down or reach up to look over the screen.
And
I have found that there is a large gap between the top of the wiper and
the top of the screen, just at my eye-level, so I either have to hunch
down or reach up to look over the screen.
 While I was measuring the length of the wiper (7") I also checked the passenger side wiper and to my surprise it was 8".
So a simple quick fix, I swapped them over.
Much better.
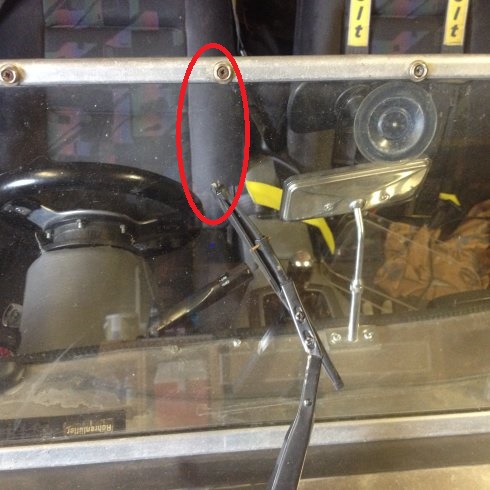

So a simple quick fix, I swapped them over.
Much better.
Wednesday, 30 March 2016
More Cooling System
Having 'fixed'? the cooling system I am now having trouble getting
her up to temperature. The gauge was hardly indicating and the ECU
software thought she was running at only 73C. I had been convinced
by the other Rover chap that the temperature sensor was faulty and
he sent me his spare to try out. So I swapped them over
at the weekend, I took her out yesterday and it had no effect except
the ECU now thought it was running at 70C
So hypothesis number 11 was that actually the radiator, contrary to everything I have ever said, is actually very efficient. And although the thermostat is rated at 88C, that is fully open and it actually starts to open at 76C. So the guess is that the moment the thermostat cracks open that allows enough water to flow through the radiator to keep the engine cool. So I needed to make the radiator less efficient.
 Decided it was time to fall back on the tried and trusted method we
used when I was a 'lad' and partially block off the front grille.
So 2 roughly cut pieces of cardboard held on with cable ties was the
'Proof of Concept'.
Decided it was time to fall back on the tried and trusted method we
used when I was a 'lad' and partially block off the front grille.
So 2 roughly cut pieces of cardboard held on with cable ties was the
'Proof of Concept'.
 Took her for a 35 min run and towards the end she stabilised at 84C (the small rise at the end was me driving slowly through a village). When I drove back home, scenic 20 min
run, I didn't bother attaching the laptop but she warmed up to
temperature much quicker and I got the impression she stabilised
around 86-88C, which would be logical.
Took her for a 35 min run and towards the end she stabilised at 84C (the small rise at the end was me driving slowly through a village). When I drove back home, scenic 20 min
run, I didn't bother attaching the laptop but she warmed up to
temperature much quicker and I got the impression she stabilised
around 86-88C, which would be logical.
Plan now is to do a much longer trip tomorrow and see what happens.
 Meanwhile, did a more permanent solution. Two properly cut pieces
of cardboard covered in baking foil. Very Smoooooth :-)
Meanwhile, did a more permanent solution. Two properly cut pieces
of cardboard covered in baking foil. Very Smoooooth :-)
So hypothesis number 11 was that actually the radiator, contrary to everything I have ever said, is actually very efficient. And although the thermostat is rated at 88C, that is fully open and it actually starts to open at 76C. So the guess is that the moment the thermostat cracks open that allows enough water to flow through the radiator to keep the engine cool. So I needed to make the radiator less efficient.


Plan now is to do a much longer trip tomorrow and see what happens.

Wednesday, 16 March 2016
Idle Speed Changed
Ever since I have had the car she has happily idled at 1000 rpm. I wasn't worried, but did wonder why everything I read said that the engine should normally idle at 850rpm. But now I know how to reprogram the ECU I sent the appropriate code to drop it by 150 rpm. It seems to have worked well and when the engine is warm it happily quietly burbles along at 850rpm with no hunting or surging.
What I found during the investigation is that the Rover engines normally leave the factory with a default idle speed set at 950 rpm but with a tuneable offset of -100 rpm. For some reason the (my?) Superspec seems to have left the factory with the offset at +50 rpm.
What I found during the investigation is that the Rover engines normally leave the factory with a default idle speed set at 950 rpm but with a tuneable offset of -100 rpm. For some reason the (my?) Superspec seems to have left the factory with the offset at +50 rpm.
Thursday, 10 March 2016
Driver Seat Belt Extension Fitted
Ever since I have had the car, the seat harness has been a very 'snug' fit,
but there was no adjustment left in the buckles. And with having to
wear bulky winter clothes it was getting a bit of a challenge. And I
also noticed that I was unable to get the buckle right in the middle,
but it was offset to the outside of the car. So time to fix that.
Seat out, bottom mounting removed, 3" extension strap fitted, seat back in and perfection. I now have the buckle dead centre and about 1" adjustment either side.


Seat out, bottom mounting removed, 3" extension strap fitted, seat back in and perfection. I now have the buckle dead centre and about 1" adjustment either side.

Looks great, pity no-one will ever see.
I then strapped in the passenger seat, for the first time ever, and
found it was exactly the same, it is impossible to get the buckle
centrally positioned on the body. Obviously all my passengers have
been too polite to point it out
So another extension piece on order so I can do that as well.
Later. Belt arrived, fitted, so now passenger has full adjustment available and can centralise the buckle.

Tuesday, 8 March 2016
Relays Revisited
When I first checked out the relays there were lots of questions left outstanding. Since working on the lambda sensor change I have managed to answer most of them. The original post is here, with the changes in Red. Here are the specific updates:
 The 2 relays on the left appeared to be 2 of the 3 relays I could not find (ECU, Lambda & Fuel Pump). While writing my software analysis program I found a way of testing the fuel pump relay while the engine was off. And by holding it I was able to confirm that the one on the Right was the Fuel Pump.
Also, I had previously found that removing the one on the left stopped the Fuel Pump working so I think we can safely say that one is the main ECU relay as the first thing the ECU does when you turn on the ignition is prime the fuel pump for 2 seconds.
And it turns out the Lambda system relay actually controls the Sensor heater, not the sensor itself, as the heater is not switched on until the engine actually starts. So removing it would not stop the Fuel Pump from priming. The only problem is that I have absolutely no idea where it is in the car. It must be well hidden.
And I have since been told that there are no headlight relays fitted to the car. I find this odd, as the headlights are quite old and must have quite a heavy current drain and if there are no relays then all that current must go through the light switch.
So now just 2 outstanding questions:
1. Where is the Lambda heater relay ?
2. Are there actually no Headlight relays ?
Also, I had previously found that removing the one on the left stopped the Fuel Pump working so I think we can safely say that one is the main ECU relay as the first thing the ECU does when you turn on the ignition is prime the fuel pump for 2 seconds.
And it turns out the Lambda system relay actually controls the Sensor heater, not the sensor itself, as the heater is not switched on until the engine actually starts. So removing it would not stop the Fuel Pump from priming. The only problem is that I have absolutely no idea where it is in the car. It must be well hidden.
And I have since been told that there are no headlight relays fitted to the car. I find this odd, as the headlights are quite old and must have quite a heavy current drain and if there are no relays then all that current must go through the light switch.
So now just 2 outstanding questions:
1. Where is the Lambda heater relay ?
2. Are there actually no Headlight relays ?
Clutch Revisited
Had a 'clutch' day today. A couple of years ago I redesigned the pedal/cable join to
eliminate the 'kink' that causes Superspec cables to break (described here). That
resulted in the cable being too long and I took up the slack with a
piece of copper plumbing pipe.
 While I was underneath at the weekend securing the lambda sensor wiring I
noticed that the pipe had actually settled at quite an angle, which was
introducing a bend in the cable, the one thing I was trying to avoid.
While I was underneath at the weekend securing the lambda sensor wiring I
noticed that the pipe had actually settled at quite an angle, which was
introducing a bend in the cable, the one thing I was trying to avoid.
 So took it out and built a new spacer from a block of wood (more
forgiving than copper) and a stainless steel bracket to mount to the
bolt you can see (and covered it in black masking tape to disguise the
fact it was wood ).
So took it out and built a new spacer from a block of wood (more
forgiving than copper) and a stainless steel bracket to mount to the
bolt you can see (and covered it in black masking tape to disguise the
fact it was wood ).
So now the cable meets the hole at 90 degs, avoiding the bend I had before.
Took her for a drive and the clutch is silky-smooth Bite point is a bit lower than I like so next time I have her on axle stands I'll wind it up a bit.


So now the cable meets the hole at 90 degs, avoiding the bend I had before.
Took her for a drive and the clutch is silky-smooth Bite point is a bit lower than I like so next time I have her on axle stands I'll wind it up a bit.
Wednesday, 2 March 2016
Redesigned Exhaust System
For a long time I have thought I should fit a flexible joint into the exhaust system to isolate the engine vibration from the catalytic converter and silencer. Now I had 3 complete exhaust systems
I felt now was the time. So out came the angle grinder and the result is very good.
 Ignore the reflection, I don't have twin exhausts :-)
So now the exhaust consists of the manifold, then a short length of pipe that mounts the lambda sensor, then a short flexible joint and finally the combined catalytic converter and heat shield.
It's a pity that it will all be hidden when I put the heat shield back on. Maybe I won't bother.
I felt now was the time. So out came the angle grinder and the result is very good.

So now the exhaust consists of the manifold, then a short length of pipe that mounts the lambda sensor, then a short flexible joint and finally the combined catalytic converter and heat shield.
It's a pity that it will all be hidden when I put the heat shield back on. Maybe I won't bother.
Tuesday, 1 March 2016
Lambda Sensors
Having now proved that the lambda (O2) sensor was probably not working, it was time to do something about it. I had a spare sensor, so the first thing to do was to remove the old one. This turned out to be easier said than done, as it had been in the pipe for about 10 years and was corroded in. So I took it to the local garage who managed to cut it out. The sensor was wrecked in the process but that didn't matter.
While this was going on two things happened. For some months I had been watching a Superspec exhaust, complete with lambda sensor, catalytic converter, silencer and heat shield that was on E-Bay. The owner was gradually reducing the price and it was now down to £75. As the RRP is about £500 I decided it would be a good buy. At the same time someone I was working with on the software program said he had a spare sensor and would post it to me.
So I suddenly found myself with 3 complete exhaust systems with sensors.
 First thing to do was to mount the new exhaust pipe and sensor. It looked good, but unfortuately when I took her for a run the sensor did not work at all. That was rather worrying and I wondered if I had a more fundamantal problem.
But the next thing to try was to fit one of the new sensors instead. I was actually quite pleased when I took the old sensor out and it was completely 'coked' up. I suspect the previous owner ran it on his car without the heater connected and it just 'sooted' up.
So took her for a run with the new sensor fitted (with the wires from the sensor and the loom simply twisted together) and this was the result (Shows before, with the original sensor, and after, with the new one):
 So we can see the new sensor is working perfectly, rapidly switching between 0.1V-0.9V, which is how it is supposed to be. And just as a check I tried the other sensor I had been given and got an identical result.
So I now have 3 complete exhaust systems, with 2 working sensors and possibly one more if it starts to work after I have cleaned it.
While this was going on two things happened. For some months I had been watching a Superspec exhaust, complete with lambda sensor, catalytic converter, silencer and heat shield that was on E-Bay. The owner was gradually reducing the price and it was now down to £75. As the RRP is about £500 I decided it would be a good buy. At the same time someone I was working with on the software program said he had a spare sensor and would post it to me.
So I suddenly found myself with 3 complete exhaust systems with sensors.

But the next thing to try was to fit one of the new sensors instead. I was actually quite pleased when I took the old sensor out and it was completely 'coked' up. I suspect the previous owner ran it on his car without the heater connected and it just 'sooted' up.
So took her for a run with the new sensor fitted (with the wires from the sensor and the loom simply twisted together) and this was the result (Shows before, with the original sensor, and after, with the new one):

So I now have 3 complete exhaust systems, with 2 working sensors and possibly one more if it starts to work after I have cleaned it.
Monday, 29 February 2016
MEMSLogger/MEMSAnalyser
After doing a lot of work on my analysis program I decided it was good enough to release to other owners.
The final package comes in 2 parts. The first program uses a batch file called MEMSLogger which produces a comprehensive log file while you are driving. This is then read in by MEMSAnalyser, which produces a graphical display of the trip.

Across the top are the most useful parameters, each of which can be selected and displayed.
Across the bottom are various selections so you can display segments of the trip over various times. A vertical marker allows you to examine individual data points. And on the right are red/green flags for the various fault codes.
There is also a User-Defined button to look at all 60 parameters, many of which are still unknown.
 Here is a screenshot using that button to look
at the Short-Term Fuel Trim over a 10 minute period:
Here is a screenshot using that button to look
at the Short-Term Fuel Trim over a 10 minute period:
The whole package can be downloaded from http://www.rmrsoft.com/mems All comments and suggestions are more than welcome.
I am particularly interested to know if it works with MEMS 1.9 and what the unknown parameters might be.
Wednesday, 10 February 2016
ECU Analysis
Busy time over the last few days. Now I can 'talk' to the ECU I needed
some way to interpret the results. So I have built a program to do the
analysis. Took her out 4 times today (beautiful weather, perfect for
driving) to get some data points.
Here are some results (You can see the parameters I can analyse across the top of the screenshot).
 First the temperatures in and around the car: Not bad
 Now the ignition timing: Again looks good, switching from 5-25 deg advanced.
 Finally the lambda (Oxygen) sensor voltage. This does not look so good
and seems to indicate it may not be working properly. More research
required
Finally the lambda (Oxygen) sensor voltage. This does not look so good
and seems to indicate it may not be working properly. More research
required
Worth pointing out I am temporarily running with both exhaust pipes open. I will block one shut tomorrow and see if the data shows anything different.
Fascinating stuff. If anyone wants to try the software you can get it from http://www.rmrsoft.com/MEMS.zip
Here are some results (You can see the parameters I can analyse across the top of the screenshot).


Worth pointing out I am temporarily running with both exhaust pipes open. I will block one shut tomorrow and see if the data shows anything different.
Fascinating stuff. If anyone wants to try the software you can get it from http://www.rmrsoft.com/MEMS.zip
Thursday, 4 February 2016
Longer Wind Deflectors
The Wind Deflectors I fitted were a huge success, enabling me to dispense with the doors and still drive in windy conditions and even light rain. The only slight problem was that I used to get a cold/wet elbow as they were not really long enough. So today I replaced the 300mm deep ones with a set of 500mm deep ones, adding a third mounting bracket at the bottom for added stability. Here is the old and new.

Tuesday, 2 February 2016
A Bit of Bling
I have always admired new sports cars that have painted calipers. In my case it will have to wait until I take them off for servicing, but meanwhile there was nothing to stop me doing the discs. So having primed them before, a quick spray of top coat of caliper paint and I love the look.


Suspension Check
It's always a worry with a hand-built car that everything is nice and tight. A good tip I picked up from the forum was to use Tippex to mark the crucial nuts and bolts. That way it is obvious if they start to undo. So I started with the rear suspension,.


Monday, 1 February 2016
Handbrake Warning Light at Last
Ever since I had the car and got caught out by driving away with the
handbrake on, the number one job on my ToDo list was to fit a
Handbrake Warning Light. As of tonight I have one.
A few months ago I bought a second-hand Sierra handbrake as a spare and found it had a warning light switch built in. My idea was to replace the exciting handbrake with this new one, a fairly major job as the mechanism under the floor has been 'scrunched' a bit after repeated impacts with the road.
 But when I
looked closely this morning I saw the switch was actually just
clamped onto the handbrake through a couple of indents.
But when I
looked closely this morning I saw the switch was actually just
clamped onto the handbrake through a couple of indents.
 So I
whipped out the passenger seat to access the handbrake, checked it
and bingo, it had the same indents. So a quick transfer of the
switch, wired it into the loom (the existing wiring was already
present in the tunnel).
So I
whipped out the passenger seat to access the handbrake, checked it
and bingo, it had the same indents. So a quick transfer of the
switch, wired it into the loom (the existing wiring was already
present in the tunnel).
 And I now have a Handbrake Warning Light.
Job done !!
 Later: Turned out my original wiring route wasn't suitable as it chafed, so I drilled a hole in the tunnel wall, inserted a grommet and put the wire straight into the tunnel. Much better.
A few months ago I bought a second-hand Sierra handbrake as a spare and found it had a warning light switch built in. My idea was to replace the exciting handbrake with this new one, a fairly major job as the mechanism under the floor has been 'scrunched' a bit after repeated impacts with the road.


Job done !!

Subscribe to:
Posts (Atom)