SuperSpec

SuperSpec

Wednesday, 31 May 2017

Lambda Sensor (cont'd)

Phase 2 for the lambda sensor this morning.  But before fitting the old 'overnight washed' sensor, there was an additional job.  When I put this on my blog yesterday Richard, a regular reader correctly pointed out that the recommended position for the lambda sensor is facing upwards between 10° -75° from the vertical, not pointing sideways to slightly downwards, which is the usual position for the Superspec.   Another example of poor design.  Apparently it allows condensation to gather in the sensor and destroy it.  So off came the exhaust pipe again and the sensor re-positioned to the perfect position.  

It's all starting to look a bit scruffy, but luckily it will all be hidden when the heat shield goes back on. 

So in went the 'cleaned' sensor and I took her to the scrapyard to get some bits for my next project (This is a 'real' scrapyard where you take your own tools and they just tell you to search through the cars and take what you want off the car).    I wasn't totally surprised that the closed loop light stayed off all the way there and back and a look at the data shows why:
 
Obviously no good on the journey there, but after a 'hot soak' at the scrapyard it did at least make an attempt and towards the end of the journey I could convince myself that it was 'almost' working.   So I will leave it on until I get the new one.

As an aside, I had put the top cooling pipe back in and she behaved much better. 

Back to 15 minutes to reach working temperature.   Dropped while parked at the scrapyard, but at the 30 min point I was stopped quite a long time at the traffic lights in Grantham.   She climbed to 95C, fan kicked on for a couple of mins, brought her back down to 86C and she sat there all the way home, just climbing a bit as I drove through the village and home.  Still wondering if I should replace the fan thermostat with a slightly higher one, maybe 98C.


Tuesday, 30 May 2017

Lambda Sensor (contd)


Spent a lot of today looking at the lambda sensor.   First thing to do was rebuild the exhaust pipe so the sensor could be changed in-situ without having to take the exhaust off.

So now it is facing the ground, still angled a bit to give room for the heat guard to go back on.   And the 4-way block added to allow easy switching of sensors.  And as I am relatively convinced the present sensor has been 'poisoned' by the emissions from the supposedly sensor-safe exhaust paste I used to seal the joints I decided to just use an exhaust bandage and two half pipes clamped over it to seal the joint.

Next was to try the spare sensor I had in the drawer that came with my spare 'MOT' exhaust pipe (that pipe is presently fitted with a brand new sensor) .   This was not as simple as it sounds.   Most manufacturers have standardised on white for the 2 heater wires (doesn't matter which way around they go), grey for the sensor signal and black for earth.  As you can see from the picture, this sensor came with black/black/blue/white.   A search for a wiring diagram confirmed that the heater was black/black, but if it had come from a Honda then the blue was signal and white was earth, but if it came from a Toyota then it was the other way around.   And I wasn't overly confident anyway as the previous owner had said he ran it for a long time not even wired in.

So first attempt was using the Honda system with blue as the signal.   A quick 5 min run around the houses and all I got was a flatline.  So for the second attempt I switched the wires and did the same run and the result was still a flat line.   So either I still have the wiring wrong or the sensor is shot.  I suspect the latter.

So for the third attempt I took the brand new sensor from the MOT exhaust and wired that in.  Same run and this time I saw the system go into closed loop very quickly and it stayed locked on for the whole trip.   

MEMSAnalyser confirmed the behaviour, that it switched in after 45 seconds.
 
So I now know that the sensor from the drawer is probably shot.    And now having had the chance to drive under the 2 systems, open loop and closed loop, back-to-back I can tell that the closed loop run was much better then the open loop one.    While the car drove perfectly well with a dead sensor, with a working sensor she is so much sharper and crisper and and much more positive acceleration.   So I would prefer not to drive without a sensor (even though I did it quite happily for the first 2 years)

I am a bit wary about using my brand new one, as I would prefer to keep that one for MOTs.   On the other hand the 'official' sensor runs to about £60.   So before shelling out for another one I am going to try 2 experiments:

1.  I am soaking the old one in petrol overnight as apparently that might clean off any impurities.

2.  I will get a cheap one (£7) off E-Bay and see how it works.

So we'll see how I get one with those.


Friday, 26 May 2017

Lambda Sensor

On the cooling test run the Lambda sensor was a pain in the neck.  Here is a picture of the last 30 minutes of the trip.

The first part of the trip was fine as the ECU quickly decided the sensor was useless so went into open loop (Status=zero) and as we all know the car still goes perfectly in the 'limp home' mode.   The problem occurred when I stopped for petrol (18 mins on the graph).  The ECU re-started in closed loop and because the sensor was initially OK it stayed in closed loop.   The problem, as ever, was when the lambda sensor started sulking the ECU continued to use the output and stayed in closed loop.   So for most of the journey back home she was sluggish, popping and banging from the exhaust and well down on power.   Then there would be a sudden surge in power as the sensor started working and she ran beautifully, only to revert to poor running when the sensor failed again.   Very frustrating and I am seriously thinking of disconnecting the sensor until I get round to replacing it.


This screen shot of the Short Term Fuel Trim shows the problem.
Because the ECU is trying to use the 'duff' data from the sensor, it totally wrecks the fuel/air ratio, causing all those symptoms (I think it stops at -25% to avoid ruining the engine).
Still, enjoyed driving in a short sleeve shirt for the first time this year, and my new Power Steering system worked perfectly as well.


Cooling System

Having removed the top cooling pipe I decided today would be a good time to run a test in a high temperature.   So took her out for a 55 min, 45 mile drive.   

As expected she passed 80° C within 6 mins rather than the usual 20 mins so a very quick warm up now the top of the rad is not being fed.   But again, as expected, she began to run a lot hotter and in fact she remained firmly pegged at 90° C for the remainder of the trip.   But that was because the fan was running continuously.  I don't suppose it matters, but it is a bit of a power hog and the alternator voltage dropped from my normal 13.4V to 13.2V.
So do I trade a fast warmup time for more running of the fan ?   Not sure yet.   

Still might go down the thermostatically controlled water valve inserted in the top pipe so it remains shut until the engine reaches temperature..

Saturday, 6 May 2017

DRL Upgrade

When I originally fitted the Daylight Running Lights (DRL - Total cost $3) it was always a proof of concept and a bit of fun.  They looked good but I had never had them fully road tested.

On the way to Stoneleigh I drove behind a friend Andy to see if his exhaust was smoking (no) and he confirmed that while he could see they were on, but they didn't stand out all that well.    So time for an upgrade.   

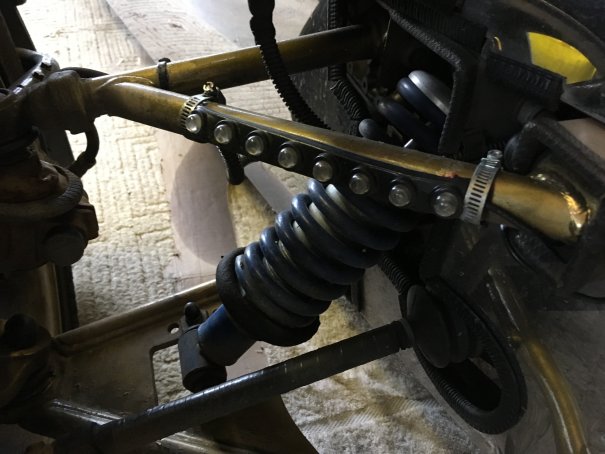
Have now replaced them with Hi-intensity LED strips that are dramatically brighter and were actually advertised as proper Daylight Running Lights and not just LED strips.

Slightly more expensive (£3/pair ) but they work extremely well.   Just need to follow someone else now to see how they hold up.
 

I actually have 2 more I could put on the lower wishbone, but I think I will then start to look like Blackpool Tower.
 

(BTW. ignore the drips on the cardboard, that was while I was fitting the extra hose to the power steering.)

Wednesday, 3 May 2017

Broken Exhaust Bracket

Decided it was time to look again at the rear exhaust bracket.  As well as being a bit ugly, it continues to ground on sleeping policeman.     I took this photo a couple of weeks ago to demonstrate the 'before' situation.

What I failed to notice was the bracket had snapped, and the exhaust had settled down and was just resting between the bobbin and the body of the car.   I must have driven all the way to Stoneleigh and back with it like that.
So urgent action required.    Out came some scraps of steel, the drill and the angle grinder and a 'temporary' solution manufactured.
 
It's basically 2 right angle pieces of steel bolted together to form a 'U' shape, with the bottom one bolted to the top of the bobbin and the top one trapped to one of the pipes using a circlip (good thing I bought a job lot of those at the Newark Autojumble. I'm using a lot lately).   It actually seems very solid so may become a permanent solution

Tuesday, 2 May 2017

Power Steering Pump Reservoir

Only been back 24 hours but been busy   To be fair, as she was working so well a couple of weeks ago, I decided to leave everything until after Stoneleigh.


One of the concerns I have always had with the car relates to the power steering pump.  Obviously the car doesn't have power steering but the power steering pump is combined with the water pump so there is no way it can be removed.  

The original Robin Hood solution was simply to run a tubes from the inlet and the output and join them together.  Here is the join, a copper pipe with the tubes clamped.


That is all well and good, but if ever the fluid leaked you would have no way of knowing and eventually the pump would run dry and would fail catastrophically.
 

First thing was to replace the piece of copper pipe holding the 2 ends together with a brass T-piece and put a third piece of pipe on that.    Here is the result:


When I split the pipe no fluid emerged, and once I had the third tube in I put a small funnel in and added some fluid.   It took a disturbingly high amount.   So maybe I caught the system just in time.  Remember, this has been running like that for 8 years.

The next stage was to fabricate some sort of reservoir to attach to the other end of the new pipe to hold the fluid.  I had been looking at various options but while I was at Stoneleigh I found these:

The plastic reservoir is off a hand-held paint spray , the adapter is off an air compressor tool and the fuel pipe was from the the spare stuff Pete gave me with the car. 

When It came to mounting it I could have put it on the left of the car just back from the T-piece, but that was very close to the exhaust so there would be a danger of the fluid boiling. 


But I had plenty of pipe so I decided to mount it front right of the engine bay where there is plenty of room.  And mounted it using the double circlip method.  Rock solid.


So job done, I just need to go and buy some more power steering fluid to completely fill it.


Sunday, 30 April 2017

Stoneleigh

With the shrinkage of the kit cars shows, we really only have Stoneleigh left, the first show of the summer season.   So I really ought to go, particularly as the Club holds it's AGM and then lays on a hog roast.  I wasn't sure about camping overnight but eventually decided to do it.

First nice surprise was that the Show had recovered from a poor showing last year to quite a respectable number of kit cars and trade stands.  Maybe the weather last year put people off. 


On the Club stand we had 60-70 cars on the Sunday.  Not as good as the 100 I saw 3 years ago, but much better than last year.

 So had a good day looking around and then a nice evening sitting around chatting, with beers and pork baps.   Went to bed at 10:00 and a few minutes after I settled in it started to rain.   It carried on till 05:00.    


But at 08:00 when I got up it was nice and clear.  So back on the Club stand with the car.   This time only the real die-hards were there but it was still nice to wander around chatting.

Left at 14:30 for a nice run back.   All in all a very pleasant weekend.
 

Sunday, 23 April 2017

Stilton Cheese Run

Lovely day out driving the Stilton Cheese Run, for the 4th year in a row.   On my first run we had 4 cars, this year we had 16 Robin Hoods and 4 other cars, all in formation.  And 3 other Robin Hoods who decided to drive the route as individuals.

Everyone arrived at Uppingham before 10:00 and parked up.   Apart from us there were 300 official entries and I reckon another 100 unofficial entries.    A quick look around and saw these:
 

Looked at all the other hoods and saw my next project.  Isn't that the most fantastic colour scheme ? 
 
 
First problem was to find somewhere we could group up before starting.  We picked a cul-de-sac near the start.   It looked like this :

I was slightly worried the residents might be annoyed, but actually they were very happy and came out and chatted away with us.  One lady filled a couple of water bottles and as we left shouted she would do tea and cakes next year.


Then at 11:00, off on the run, the first half took 1:10 hrs and we finished up at New Lodge Farm.  Janet had brought Neve to see us, which was nice, so the other drivers, some of who had seen her last year, met her again 1 year later.   Time for a quick cup of coffee and a snack.


Then off for the second half of the run, which took about 40 mins, with a now usual stop for a photo op of a very impressive viaduct we go under.  I was about Number 6 in the queue so a hidden here.


After lunch at Stilton we all drove back home.  For me it was 30 miles up the A1.

The Tiger wasn't perfect unfortunately.   The cooling system was fantastic and worked exactly as it should (first time in 4 years), but the lambda sensor started playing up, so although she was perfectly drivable, I was a bit down on power and a bit sluggish.    As it happens that did not matter with 20 cars in formation on country roads.  I don't think I actually ever got into 5th gear.   It eventually started to work on the last leg up the A1 when I cruised happily at 70mph.

And the weather was perfect, of course.  I started the day wearing a shirt, jumper, fleece, neck scarf, gloves and woolly hat.    By the time I got home I was just wearing shirt and jumper.    So 100 miles covered all together.      Now looking forward to Stoneleigh Kit Car Show next weekend.


Saturday, 8 April 2017

Spark Plugs

Mustn't forget annual maintenance, particularly as she is getting on a bit.   Decided it would do no harm to give her a new set.

 Very pleased to see the heads were a perfect chocolate colour showing the mixture is perfect.

Slightly concerned at the oil on the threads, looks like there might be a small oil leak from the valve cover gaskets,

Monday, 27 March 2017

Back to the Factory

Every so often Great British Sports Cars (who took over Robin Hood Engineering) have an Open Day, with coffee and cakes.   So I took the car there, as she was first sold from there as a kit about 15 years ago.    Here are some pictures:


Tuesday, 28 February 2017

More Bling

Recently I was looking at some pictures of another Superspec in Italy and realised that we were missing something that most other cars have, the make and model number in chrome on the back.

 Easily fixed.

Thursday, 23 February 2017

Hot exhaust sign

Having already had a passenger with a burnt leg I decided to add yet another warning message.

 Hopefully it will help.

Wednesday, 22 February 2017

Lambda Sensor

When I took her out a couple of weeks ago it was obvious the lambda sensor was not happy.  This was the data readout:


What should happen is that the ECU sets the status to ON when the engine starts, then monitors the output from the sensor.  If it doesn't see a proper signal after about 80 seconds it switches the status to OFF.  So there were 2 things wrong:  The status started at OFF;  the sensor never really started working.

However, I had just redone the exhaust join upstream of the sensor and, although the sealant was supposedly sensor-safe, I wasn't convinced it hadn't coated the sensor, so I was hoping that a good run would burn off the containment and then on a second run it would all start working again.

So out for a good run and this was the result:

So it was nice to see that the status started at ON.   And also I had been a pessimistic as it seems the contaminant burnt off very quickly and the sensor started to work.  What was a surprise was that the ECU left the status at ON for over 2 mins with a non-working sensor.  Never seen that before.

Still, nice that everything is working. 
 

Thursday, 5 January 2017

New Milestone

Just back from a nice long 2:20 hr trip.  Weather was a bit chilly but I wrapped up well.  During the trip I also passed another major milestone.
 

Clue:   She had 6650 miles on the clock when I bought her.


Tuesday, 27 December 2016

Xmas Present

Just done a test run of my Xmas present:


It isn't just a hat though, I have plenty of those, this one is special in that it has Bluetooth headphones built in     Test run a huge success, very comfy and warm (although not heavy so I can probably continue to use it in Summer),  headphones had plenty of volume, even though the exhaust is now REALLY blowing and I listened to a whole episode of R4 Friday Night Comedy, on my round trip.
 
The only slight drawback is that if the mask covers my nose then my glasses immediately steam up.   So I have to pull it down slightly to expose my nose  (Most of us drive with glasses on since one chap had hid windscreen shatter, and it is safety glass rather than laminated so he was showered with glass).  But nose didn't get cold
 
Very successful

Monday, 19 December 2016

Fitted Cargo Net

It's a bit cold to tinker at the moment, but just had a successful 15 mins with her.  I have had 2 'niggling' problems that I have been living with for some time:

1.  The carpet in the passenger footwell has to be loose so you can access the bolts holding the exhaust heat shield.   It is held in by velcro, but occasionally the wind coming into the side of the footwell gets behind the carpet and dislodges it.

2.  Now that plastic bags have been declared 'persona non grata' I've got in the habit of carrying one of the reusable shopping bags  (known as 'envirosacs' apparently)  around in the car, for ad-hoc visits to supermarkets.   The glove box has got a bit full so I normally just chuck it in the passenger footwell, but three times recently it has actually been 'sucked' out of the footwell and flew out of the car  (the aerodynamics of these cars is totally off-the-plot).    Cue a U-turn (once in total darkness) and a drive back to try and find it.

So I realised I could cure both problems by fitting one of these mini cargo nets to the side of the car.    Here is the result:


And with the envirosac in:   (And actually room for more, hat, gloves...)
 

Job done.  The carpet will never come loose and the bag will never get sucked out.

Tuesday, 13 December 2016

Brake lights

Been a bit quiet recently but took her out 3 times last week.   Nice run down to see latest grand daughter on Sunday.    The engine loves this cool damp air, she ran like a sewing machine and once again I found I was having to force myself to slow down.   I really don't know why people SORN the cars over the winter, it is lovely.   Temperature stabilised at 86C, which I am quite happy with.  It could run hotter but anything above 80C is enough to boil off contaminates in the oil.

But on the way back, as it was getting dark, I noticed the brake lights weren't working again.  The warning glow behind the dash next to my right knee once again proved it's worth, as I would never have known otherwise.

This normally means the adjustment has vibrated out, but this time that didn't seem to be the problem.   Taking the switch out it all worked fine, but once I mounted it back it stopped working.   Wiggling the wires made it flicker so I put new spades on both wires.   Didn't help.   Eventually I figured out the contacts inside the switch had become intermittent.  You may recall the original switch had corroded and I had replaced it with one of a Mini that I got for 99p.   I guess 3 years is not bad for 99p.

So this time I decided to splash out and get one from a Land Rover Defender on the basis that might be heavier duty.  Cost the grand sum of £3.25

LAND ROVER BRAKE LIGHT SWITCH, LAND ROVER, DISCOVERY, ETC, MINI
Fitted it and everything was fine.   The only problem was getting the adjustment right.   Up to now I have adjusted the whole mounting unit, but as this has to be mounted using self-tappers (If nuts/bolt used then it needs a second person to access the underside of the pedal box) these are not designed to be repeatedly taken in and out so have now worn.   So had to come up with an alternative solution.   Have always been happier working with wood than metal (Remember the wooden clutch cable adjuster with is working perfectly), probably because I did woodwork at school rather than metalwork.  
So I decided to use a wooden wedge, initially cutting it roughly to size and then using a Surform plane to gradually reduce the length until the switch was in exactly the right position.
 

Success, very solid fit and lights come on perfectly when pedal depressed.

Monday, 28 November 2016

Day out after a long gap

After over a month sitting in the garage (another reason not to go on long holidays) and the weather was good, it was time to take her out.   I had the trickle charger on for all that time so she leapt into life and actually ran perfectly straight away, where she is often a bit 'lumpy' for the first minute or so.


Arranged to meet Andy (the chap with the other Superspec) for lunch at a pub in Rockingham.   Obviously a bit chilly, and although the engine loved the cold air it was breathing in, it refused to get up to a decent temperature so I didn't get the usual warm air flowing up from the footwell.   Time to reinstate the 'shutters' on the grid I think.    


Also the cold meant the tyre pressure was only 16psi and they wouldn't warm up either, so time to put another couple of psi in them.   Otherwise lovely journey and nice lunch.


While we were there we decided to go and have a look at the Rockingham Speedway Circuit.  I have driven past it often enough but never been in.   And as it was only 3 miles we decided to swap cars so we could compare them.  Interesting experiment.   Andy thought his steering was heavy and preferred mine but I found his steering very light but it refused to self-centre after going round corners, which was a bit off-putting. And his clutch was how mine used to be, i.e bite point near the floor and either 'on' or 'off',   So we discussed how to sort his out by tightening the cable a bit.  Otherwise they seemed pretty similar.

Rockingham is a very impressive setup and interestingly there was a sign saying "Site of the 2017 British Grand Prix".   First I have heard of that, I guess it can't be Formula One.

What was on was a 'Learn to Drift" school, with 4 cars sliding around a wet patch doing doughnuts and driving sideways.  I actually have a TravelZoo offer to do this for £69, so sorely tempted.  Anyone care to join me ?

Then a nice run back up the A1 to home.  Good day.

Saturday, 22 October 2016

Built-in Battery Charger

I've noticed recently that the battery is losing charge very gradually.  I doubt it is the battery itself a it is relatively new, so I guess one of my 'modifications' is causing a leak.   As it happens I have been thinking of buying a 'smart' battery charger (One of those you can leave permanently connected and it will not overcharge the battery) for some time, particularly as I am about to leave her for 3 weeks.   And we know now that disconnecting the battery is not a good idea as you lose the idle settings in the ECU.

But I also wanted one where I wouldn't have to keep taking the bonnet off to clip the leads on.  So I bought one that had a detachable lead and plug/socket.  It then has 3 optional types of lead to connect to the battery, a normal one with crocodile clips, one with a cigarette lighter plug and one with just 2 bare wires.  The first and third came with the pack, the cigarette one was extra.   So I used the ones with 2 bare leads.

So I wired the lead into the passenger footwell (The 6-way plastic connector on bottom right is connected directly to the battery, and you can see the red lead going vertically up to an in-line fuse).   This area is becoming even more of a 'rats-nest', I really ought to tidy it up.  On the positive side I know what every wire does

And the other end of the lead comes out just by the passengers arm rest.   This shows it with the charger plugged in.  In day-to-day driving it is nicely hidden away.   So now it is a 20 second job just to plug/unplug the car.

What's the odds on me driving out with it connected one day

Tuesday, 11 October 2016

Progress on Lambda Sensor

Time to look into my odd lambda sensor behaviour.  As far as I can see there are only 3 reasons for this:    ECU not programmed correctly (not much I can do about that),  lambda sensor heater relay (which should power the heater on engine start) not operating correctly or a dodgy lambda sensor.  


First thing to do was to give some visual indication of the heater status.   I decided to 'borrow' the headlight full beam warning light, which although fitted, hasn't been wired in yet.
 

Next I tried too reproduce the problem, this time by driving to the Post Office, sending off some build-DVDs to a new Superspec owner, then driving back.  and to add another factor I stopped for another couple of minutes in a layby.
    
 Here is the RPM display. So the profile was 7 mins to the Post Office, 2 mins with the engine off, 2 minutes driving, 2 mins with the engine off then 3 mins home.

And here was the lambda trace. So I guess the good news is that the problem was not a one-off but is reproducible, so that will make testing easier. 


We can see that while sitting at the Post Office the lambda sensor went to it's default 0.45V although the ECU still showed it's status as being on-line  (it's a bit odd but we can only assume that was a decision by the Rover programmers).    But when I started the engine at the 9 minute point, it didn't react enough to the exhaust gases and at the 10 min point the ECU have up and switched it out of the circuit.   Even on the next engine start at the 15 min point it still isn't really reacting properly.

I need to do another test run tomorrow, but this time switching the ignition off between sessions (I had to leave it on to keep the data flow going), to see if rebooting the ECU helps.

However, the really important thing is that for all 3 of the engine starts, the warning light illuminated so we can rule out the relay as the problem.   So I guess the next thing to do is try a replacement sensor.  


I have a couple of spare ones but unfortunately, last time I rebuilt the manifold/pipe join I stupidly positioned the sensor so there isn't enough clearance with the body to get it out without taking the exhaust pipe off.


So I'll leave that test until the next (inevitable) time when I have to remake the joint again.

Friday, 30 September 2016

Odd Lambda Sensor Behaviour

Took her for a test run this morning.   Drove to the surgery (5 minutes), turned off engine but left the data logger running while I was inside (5 minutes), then drove back home (5 minutes).

This was the lambda trace:

You can see it behaved itself on the way there, but when I restarted the engine to come home the sensor was so slow in reacting that the eCU gave up and went open loop for the whole trip back.  I have seen this before but never reproduced it this cleanly.

I now need to figure out why it is doing that.

Tinkering

Useful couple of hours this morning.

1.   Wound clutch out a bit so the bite point is right in the middle of the travel.  Feels just right now.

2.   Following the odd rattle and vibration I have noticed at very slow speed, decided to check the engine and gearbox mounts.  Engine mounts were rock solid but the gearbox mount, whilst not exactly loose (it's a rubber mount), allowed 2 further revolutions of tightening up of the bolts, so did that.  Can't really tell if it has improved anything.

3.   Greased the rear suspension units to try and stop the squeaking I have had for 3 years.    Don't think it helped much.

4.   Rebuilt exhaust again (It started blowing again after 100 miles), using Plan D 
  
Cleaned it all off, pushed the pipe in as far as I could and added a few taps with a rubber mallet.    Then surround the joint with an exhaust 'bandage'. 
Then, this time, I split the stainless steel pipe into 2 halves;


And clamped them around the join to give added support and hold the bandage in place.  

 Let's see how that goes.     If this fails I will give up and just live with the exhaust blowing a bit.   


It's interesting that when it actually starts to blow the performance of the engine drops off a cliff, but after about 5 minutes, once the ECU has figured out what is going on and adjusts itself to cope, the performance returns and she runs perfectly well, just a bit noisy.

Sunday, 25 September 2016

New Windscreen Washer Bottle

I had noticed the windscreen washer bottle was empty even though I had filled it up just before the MOT.   Took it off and found that no only was it leaking but the motor outlet had snapped off.


So it was onto E-Bay and a new £10 windscreen water bottle arrived today.  

Astonishingly, considering it was generic and I had purchased it purely based on the size, it not only had the same bulkhead slide connector but the electric plug was the same.  So 3 minutes later (much of which was spent going to the kitchen and back to get water) I have a new fully working washer system.