SuperSpec

SuperSpec

Thursday 26 December 2013

My First Crash

Just had my first crash :-)

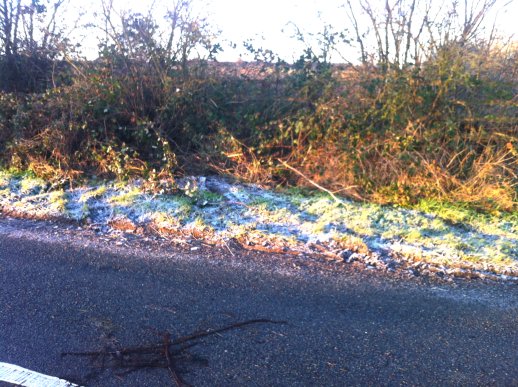
On the way back from the filling station, there is a sharp corner and I have got into the habit  of going round fairly briskly in 3rd gear and hitting the throttle half way round for a bit of a slide (great fun).   I was behind someone today so was actually in 2nd gear and the road must have been a bit damp as I did the same trick, the back end departed, car went sideways and I exited stage right into the hedge.  Luckily I was at low speed and there was no ditch so although the front of the car was well buried in the undergrowth, I was able to back out under my own steam.   Got the radiator intake full of vegetation but the only damage is to the number plate, the offside wing, and my pride    I suppose it was inevitable this would happen eventually, so I was lucky that at least the damage is minimal.  I will treat her with a bit more respect now and perhaps start acting my age. :-)


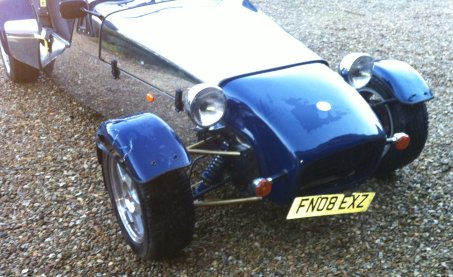
Here is what she looks like (although I did give her a good clean before the taking the photo)


So I just need to buy a new number plate and learn how to 'patch' repair GRP.   Another 'entry' I shall add to my skill set.  I'm guessing it is just like repairing fibreglass. 

And here is the scene a couple of days later.  The hedge was so overgrown that no-one would ever know if it wasn't for the tyre tracks :-)

Friday 20 December 2013

Exhaust Pipe Repaired

After a bit of driving I got the impression the exhaust was blowing a bit.  There were various symptoms:

a.  I could hear a noise coming from the side of the car.

b.  There was a bit of a 'burble' on the overrun.

c.  The car was not happy when running in 1st gear after being left for an hour or so.   I suspected that was down to the lamda sensor not reading correctly and that would be explained by a leak just in front of it.

d.  The car had been marginal on the emissions test, again pointing to the lamda sensor not getting the right readings.    

Once I removed the heat shield it was confirmed as there was a distinct sooty deposit on the bodywork.

The lamda sensor is just behind the leak.

So I removed the clamps and the outer tube and it was apparent that there was no corrosion, it was simply that the sealant used by the previous owner had all disappeared and it was simply leaking through the joint.
That was not surprising as the exhaust had been fitted 5 years ago and not touched since.   Also the exhaust manifold is 'lagged' inside the engine bay to cut down the heat, but that does mean that the joint would have been running hotter than normal.

I decided to repair it using a mix of new ideas and the 'old-school' approach.   It meant it is rather 'over-engineered' but that is no bad thing.

So first a liberal dose of Gun Gum (that is what we used to use and is still the best around), followed by a thin aluminimum foil protector.


Followed by an exhaust bandage that solidifies with the heat of the exhaust.


And finally a clamped cover to protect and support the whole thing using an empty Heinz Baked Beans tin (honest!).   That is what we used to use 40 years ago and it is still perfectly good.


Result:   A quieter exhaust and engine running smoother.  Hopefully it will have improved the emissions, I will find out at the next MOT.

Monday 16 December 2013

Handbrake Warning

I soon found that I kept forgetting to release the handbrake before moving.  

And the design of the Superspec means that it is very difficult to release it when you are already strapped in (a combination of the handbrake being in the passenger footwell and the fact you are strapped in with a 4-point harness). 


So I determined I needed to fit a warning light. 

That needed a switch and after trawling E-Bay I came up with this one.


The first idea was to just pop-rivet it to the floor underneath the car, in front of the handbrake.   But I realised I need to be able to adjust it after it was fitted to ensure it matched the position of the brake.   And after breaking 3 drill bits in fairly short order I decided to rethink the design.   So I mounted it on a separate piece of stainless steel with adjustable slots that I could mount on existing bolts in the floor.

The idea was good but unfortunately I found that the movement of the mechanism under the car was not sufficient to overcome resistance in the spring so it was impossible to adjust it correctly.    It looks as though I will have to do something inside the passenger compartment, where the movement of the lever is greater.

So after quite a lot of work I am back to square one.    But that is half the fun of course.

Monday 9 December 2013

Brake Lights

At some point the brake lights failed. No idea when as it is not something you see as a driver. After some investigation it appeared the switch was the cause. When I took it apart it was burnt and corroded inside. Apparently not unusual. 

This is the location of the switch, just in front of the brake pedal. 
Pressing the brake pedal closes the switch and turns the lights on.


 I couldn't find a replacement but did find one from a Mini on E-Bay at 99p. 

But fitting it on showed a problem. The brake lights were permanently on. Turns out that whereas the original was a 'push-to-make' switch, this one was a 'push-to-break' switch. 


But rather than try and find another replacement I simply fabricated a new mounting bracket from a stainless steel offcut and mounted it behind the brake pedal instead of the front, adjusting it so that it was pushed close when the brake pedal was in the normal position. 


Very pleased with myself for lateral thinking !! 

Status: Complete

Sunday 1 December 2013

Auxiliary Electrical Panel

I decided that trying to fix electrical problems when things go wrong would be quite difficult and it would make sense just to 'hot-wire' them. So I decided to add an extra wiring panel to the side of the car next to the existing panel. 

Across the top were 3 'busbars' that I could just plug accessories into (such as the iPhone charger). They were: 
a. Earth 
b. 12V direct from Battery 
c. 12V from Ignition Switch 


I also added a heavy duty fuse box and mountings for 4 Relays. 

Here it is beginning to be used. The 12V Charger socket is wired in through a fuse, the bus-bars are now wired in, black for neutral, Blue for 12V Battery and Red for 12V Ignition switched. 


A few services, mainly the extra warning lights, are wired in and a voltmeter and multi-connector have been added. 

Status: Ongoing but will gradually fill it up.