SuperSpec

SuperSpec

Wednesday 31 May 2017

Lambda Sensor (cont'd)

Phase 2 for the lambda sensor this morning.  But before fitting the old 'overnight washed' sensor, there was an additional job.  When I put this on my blog yesterday Richard, a regular reader correctly pointed out that the recommended position for the lambda sensor is facing upwards between 10° -75° from the vertical, not pointing sideways to slightly downwards, which is the usual position for the Superspec.   Another example of poor design.  Apparently it allows condensation to gather in the sensor and destroy it.  So off came the exhaust pipe again and the sensor re-positioned to the perfect position.  

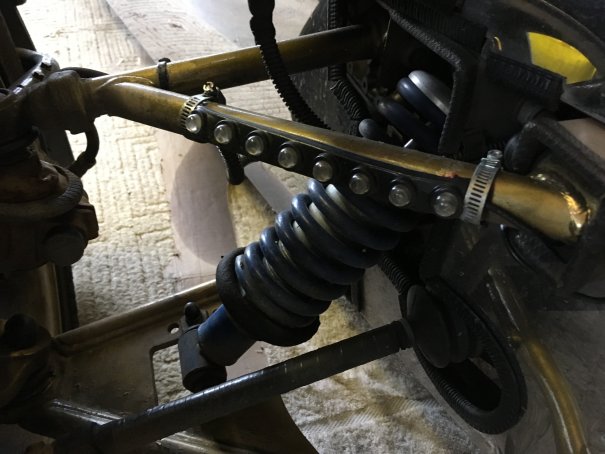
It's all starting to look a bit scruffy, but luckily it will all be hidden when the heat shield goes back on. 

So in went the 'cleaned' sensor and I took her to the scrapyard to get some bits for my next project (This is a 'real' scrapyard where you take your own tools and they just tell you to search through the cars and take what you want off the car).    I wasn't totally surprised that the closed loop light stayed off all the way there and back and a look at the data shows why:
 
Obviously no good on the journey there, but after a 'hot soak' at the scrapyard it did at least make an attempt and towards the end of the journey I could convince myself that it was 'almost' working.   So I will leave it on until I get the new one.

As an aside, I had put the top cooling pipe back in and she behaved much better. 

Back to 15 minutes to reach working temperature.   Dropped while parked at the scrapyard, but at the 30 min point I was stopped quite a long time at the traffic lights in Grantham.   She climbed to 95C, fan kicked on for a couple of mins, brought her back down to 86C and she sat there all the way home, just climbing a bit as I drove through the village and home.  Still wondering if I should replace the fan thermostat with a slightly higher one, maybe 98C.


Tuesday 30 May 2017

Lambda Sensor (contd)


Spent a lot of today looking at the lambda sensor.   First thing to do was rebuild the exhaust pipe so the sensor could be changed in-situ without having to take the exhaust off.

So now it is facing the ground, still angled a bit to give room for the heat guard to go back on.   And the 4-way block added to allow easy switching of sensors.  And as I am relatively convinced the present sensor has been 'poisoned' by the emissions from the supposedly sensor-safe exhaust paste I used to seal the joints I decided to just use an exhaust bandage and two half pipes clamped over it to seal the joint.

Next was to try the spare sensor I had in the drawer that came with my spare 'MOT' exhaust pipe (that pipe is presently fitted with a brand new sensor) .   This was not as simple as it sounds.   Most manufacturers have standardised on white for the 2 heater wires (doesn't matter which way around they go), grey for the sensor signal and black for earth.  As you can see from the picture, this sensor came with black/black/blue/white.   A search for a wiring diagram confirmed that the heater was black/black, but if it had come from a Honda then the blue was signal and white was earth, but if it came from a Toyota then it was the other way around.   And I wasn't overly confident anyway as the previous owner had said he ran it for a long time not even wired in.

So first attempt was using the Honda system with blue as the signal.   A quick 5 min run around the houses and all I got was a flatline.  So for the second attempt I switched the wires and did the same run and the result was still a flat line.   So either I still have the wiring wrong or the sensor is shot.  I suspect the latter.

So for the third attempt I took the brand new sensor from the MOT exhaust and wired that in.  Same run and this time I saw the system go into closed loop very quickly and it stayed locked on for the whole trip.   

MEMSAnalyser confirmed the behaviour, that it switched in after 45 seconds.
 
So I now know that the sensor from the drawer is probably shot.    And now having had the chance to drive under the 2 systems, open loop and closed loop, back-to-back I can tell that the closed loop run was much better then the open loop one.    While the car drove perfectly well with a dead sensor, with a working sensor she is so much sharper and crisper and and much more positive acceleration.   So I would prefer not to drive without a sensor (even though I did it quite happily for the first 2 years)

I am a bit wary about using my brand new one, as I would prefer to keep that one for MOTs.   On the other hand the 'official' sensor runs to about £60.   So before shelling out for another one I am going to try 2 experiments:

1.  I am soaking the old one in petrol overnight as apparently that might clean off any impurities.

2.  I will get a cheap one (£7) off E-Bay and see how it works.

So we'll see how I get one with those.


Friday 26 May 2017

Lambda Sensor

On the cooling test run the Lambda sensor was a pain in the neck.  Here is a picture of the last 30 minutes of the trip.

The first part of the trip was fine as the ECU quickly decided the sensor was useless so went into open loop (Status=zero) and as we all know the car still goes perfectly in the 'limp home' mode.   The problem occurred when I stopped for petrol (18 mins on the graph).  The ECU re-started in closed loop and because the sensor was initially OK it stayed in closed loop.   The problem, as ever, was when the lambda sensor started sulking the ECU continued to use the output and stayed in closed loop.   So for most of the journey back home she was sluggish, popping and banging from the exhaust and well down on power.   Then there would be a sudden surge in power as the sensor started working and she ran beautifully, only to revert to poor running when the sensor failed again.   Very frustrating and I am seriously thinking of disconnecting the sensor until I get round to replacing it.


This screen shot of the Short Term Fuel Trim shows the problem.
Because the ECU is trying to use the 'duff' data from the sensor, it totally wrecks the fuel/air ratio, causing all those symptoms (I think it stops at -25% to avoid ruining the engine).
Still, enjoyed driving in a short sleeve shirt for the first time this year, and my new Power Steering system worked perfectly as well.


Cooling System

Having removed the top cooling pipe I decided today would be a good time to run a test in a high temperature.   So took her out for a 55 min, 45 mile drive.   

As expected she passed 80° C within 6 mins rather than the usual 20 mins so a very quick warm up now the top of the rad is not being fed.   But again, as expected, she began to run a lot hotter and in fact she remained firmly pegged at 90° C for the remainder of the trip.   But that was because the fan was running continuously.  I don't suppose it matters, but it is a bit of a power hog and the alternator voltage dropped from my normal 13.4V to 13.2V.
So do I trade a fast warmup time for more running of the fan ?   Not sure yet.   

Still might go down the thermostatically controlled water valve inserted in the top pipe so it remains shut until the engine reaches temperature..

Saturday 6 May 2017

DRL Upgrade

When I originally fitted the Daylight Running Lights (DRL - Total cost $3) it was always a proof of concept and a bit of fun.  They looked good but I had never had them fully road tested.

On the way to Stoneleigh I drove behind a friend Andy to see if his exhaust was smoking (no) and he confirmed that while he could see they were on, but they didn't stand out all that well.    So time for an upgrade.   

Have now replaced them with Hi-intensity LED strips that are dramatically brighter and were actually advertised as proper Daylight Running Lights and not just LED strips.

Slightly more expensive (£3/pair ) but they work extremely well.   Just need to follow someone else now to see how they hold up.
 

I actually have 2 more I could put on the lower wishbone, but I think I will then start to look like Blackpool Tower.
 

(BTW. ignore the drips on the cardboard, that was while I was fitting the extra hose to the power steering.)

Wednesday 3 May 2017

Broken Exhaust Bracket

Decided it was time to look again at the rear exhaust bracket.  As well as being a bit ugly, it continues to ground on sleeping policeman.     I took this photo a couple of weeks ago to demonstrate the 'before' situation.

What I failed to notice was the bracket had snapped, and the exhaust had settled down and was just resting between the bobbin and the body of the car.   I must have driven all the way to Stoneleigh and back with it like that.
So urgent action required.    Out came some scraps of steel, the drill and the angle grinder and a 'temporary' solution manufactured.
 
It's basically 2 right angle pieces of steel bolted together to form a 'U' shape, with the bottom one bolted to the top of the bobbin and the top one trapped to one of the pipes using a circlip (good thing I bought a job lot of those at the Newark Autojumble. I'm using a lot lately).   It actually seems very solid so may become a permanent solution

Tuesday 2 May 2017

Power Steering Pump Reservoir

Only been back 24 hours but been busy   To be fair, as she was working so well a couple of weeks ago, I decided to leave everything until after Stoneleigh.


One of the concerns I have always had with the car relates to the power steering pump.  Obviously the car doesn't have power steering but the power steering pump is combined with the water pump so there is no way it can be removed.  

The original Robin Hood solution was simply to run a tubes from the inlet and the output and join them together.  Here is the join, a copper pipe with the tubes clamped.


That is all well and good, but if ever the fluid leaked you would have no way of knowing and eventually the pump would run dry and would fail catastrophically.
 

First thing was to replace the piece of copper pipe holding the 2 ends together with a brass T-piece and put a third piece of pipe on that.    Here is the result:


When I split the pipe no fluid emerged, and once I had the third tube in I put a small funnel in and added some fluid.   It took a disturbingly high amount.   So maybe I caught the system just in time.  Remember, this has been running like that for 8 years.

The next stage was to fabricate some sort of reservoir to attach to the other end of the new pipe to hold the fluid.  I had been looking at various options but while I was at Stoneleigh I found these:

The plastic reservoir is off a hand-held paint spray , the adapter is off an air compressor tool and the fuel pipe was from the the spare stuff Pete gave me with the car. 

When It came to mounting it I could have put it on the left of the car just back from the T-piece, but that was very close to the exhaust so there would be a danger of the fluid boiling. 


But I had plenty of pipe so I decided to mount it front right of the engine bay where there is plenty of room.  And mounted it using the double circlip method.  Rock solid.


So job done, I just need to go and buy some more power steering fluid to completely fill it.