Just had a very interesting day. On my last run I
noticed the brake lights had stopped working again. So I checked the
circuit and the switch and found everything was OK. There was 12V on
one of the switch terminals and the other terminal connected to the
lights.
But when I bridged the switch nothing happened. But, when I
put a direct 12V to the lights terminal as a test. everything lit up.
So it seems that although there is a 12V supply on one switch
terminal when measured with a meter, once you close the switch and put
the load of the lights on the circuit there isn't enough current flow to
illuminate the lights. So I can only assume that there is some
resistance in the live wire circuit.
Now, a 'real' mechanic would have spent hours tracing the circuit
back to try and find the problem. I spent 10 mins wiring in an
alternative 'jump' supply from the ignition-live circuit to the switch.
I even included an in-line fuse.
Brakes lights now working again !
SuperSpec

Saturday, 10 March 2018

Saturday, 10 February 2018
Solved battery problem


No, another red herring.
So then it was time to check the circuit. By undoing the mounting of the isolation switch I was able to isolate the battery then bypass the switch by putting a multimeter across the terminals. And Bingo, there was a 160ma drain. That doesn't seem much, but in theory it should be zero, so needed investigating.
Now, I thought the only things that are live all the time are the 12V charging socket, which shouldn't take any current, the lights, the horn and the Voltmeter I had fitted, which should take zero current. But then I realised that because the horn, the voltmeter and the oil pressure gauge are on the same panel, I had also wired the oil pressure gauge to be permanently live as well and I had no idea what the current drain on that was. So I unplugged that and the drain dropped to 60ma, so that was a help. Then just to check I unplugged the voltmeter and the current drain dropped to zero. So my voltmeter does take a current drain of 60ma (cheap off E-Bay from China so shouldn't really be surprised).
So both rewired to become
active only with the ignition.
I then wondered if that was why my previous battery had started losing charge. Luckily I hadn't taken it to the tip so for the time being I have put that back in to see if it holds charge. I'll know tomorrow afternoon.

Tuesday, 6 February 2018
Repaired Bonnet
Picked up the bonnet today. It wasn't cheap, but they have done a very
good job on it (2 man hrs work apparently). They have shaped it
correctly so it sits square and all 4 catches lock very positively.
They have knocked out the dents but were unable to get a perfect finish,
so I have an area about 10" x 6" that is 'dimpled'. His advice if I
was worried about it (which I'm not) was to put two 9" strips of 'sticky
backed plastic' either side of the bonnet as 'go faster stripes', either
carbon fibre lookalike or blue to match the rest of the car. That would
hide the damaged area. These would be on the bend of the bonnet,
leaving the central part with the louvers untouched. I'll take that
under advisement.
 And I have also riveted in a replacement louvre as the previous one was destroyed.
So that just leaves the nose cone, but I am going to wait for the weather to warm up before I tackle that, as it is perfectly serviceable as it stands.
And I now need to figure out why the battery is suddenly draining overnight. I recall knocking off the protective sleeve on the positive terminal while I was playing around shaping the bonnet so I could have shorted it and trashed the battery. (There is only a few mm clearance between the terminal and the bonnet). Or I might have damaged some of the wiring that runs down the sill. So I am charging the battery up off the car and will get it tested on Thursday and if it has failed catastrophically I'll get a new one. If not I need to trace the residual leak.

So that just leaves the nose cone, but I am going to wait for the weather to warm up before I tackle that, as it is perfectly serviceable as it stands.
And I now need to figure out why the battery is suddenly draining overnight. I recall knocking off the protective sleeve on the positive terminal while I was playing around shaping the bonnet so I could have shorted it and trashed the battery. (There is only a few mm clearance between the terminal and the bonnet). Or I might have damaged some of the wiring that runs down the sill. So I am charging the battery up off the car and will get it tested on Thursday and if it has failed catastrophically I'll get a new one. If not I need to trace the residual leak.
Sunday, 28 January 2018
First Run in 2 months
First I just sprayed blue paint over the cracks to disguise the damage. You may remember that originally the nose cone was mounted on the two steel supports at the front of the car, but I had replaced that with hinges so I didn't have to remove the grill to take off the nose cone.


Note the rectangular hole in the bonnet where there used be a louvred vent. That was totally destroyed in the crash so I drilled the remains out and I have a replacement on order from E-Bay arriving next week.
Originally I was going to do an instrumented run but the battery on my netBook was flat, so I had to rely on 'feel'. So then, with fingers crossed, I started out, conscious of the fact that she hadn't moved in two months. Battery was down to 11.8V but she still started (just) . I had originally intended to do a short test trip but she was going so well, and I was enjoying myself so much that I finished up doing 30 miles. I kept to country roads but according to the speedo on my iPhone I got up to 70mph at one point. I played safe by doing it in a clover leaf pattern based around the house to give me an opportunity to bale out if anything was wrong. I did 7 miles to the A1 and back, 11 miles to Bourne and back then 12 miles around my test route to Grantham and back.
The result was:
1. The front right indicator isn't working (easy fix)
2, One of the 4 bonnet latched came undone but there was no danger of the bonnet flying off.
3. Once she had warmed up the temperature remained rock solid.

So off to the recommended body shop next week and get quotes for straightening the bonnet and doing a proper job on the nose cone breaks.
Thursday, 25 January 2018
Nose Cone Repair (2)


Very pleased, as I now realise that of the five cracks, the main 2, where the whole nose cone was broken right through, are underneath. And once the number plate is mounted they are impossible to see unless you lie on the floor. That means I can practice on those two before I tackle the other three. You can see one of the others in this picture, on the left side of the nose cone, about 12" long


So that will just leave the bonnet to be straightened and she will be good to go.
Fuel Leak
Another nice day today so made the most of it. First I took her
outside and ran the engine up to temperature to check if there were any
coolant leaks under pressure. Initially it looked OK, but then I saw a
very small drip. Confusingly it was nowhere near any of the cooling
pipes, and a quick taste test showed it was petrol. It turned out to be
a leak where the fuel line goes into the pressure regulator.
 Amazingly the jubilee clip was actually loose and took about 6 turns to
tighten up. I have absolutely no idea how long that leak has been
there, but it could have been months as I very rarely run the engine
with the bonnet off.
Amazingly the jubilee clip was actually loose and took about 6 turns to
tighten up. I have absolutely no idea how long that leak has been
there, but it could have been months as I very rarely run the engine
with the bonnet off.
So a very useful exercise. and when I checked later when the engine had cooled down the coolant was at the same level in the expansion tank. Good news. I will still need to do some more runs to confirm it, before I go on the 100 mile+ Stilton Cheese run in April, but there is plenty of time.

So a very useful exercise. and when I checked later when the engine had cooled down the coolant was at the same level in the expansion tank. Good news. I will still need to do some more runs to confirm it, before I go on the 100 mile+ Stilton Cheese run in April, but there is plenty of time.
Wednesday, 24 January 2018
Nose Cone Repair (1)
And now the first phase of the nose cone repair. Having decided I
would need to 'wrap' the spare yellow one I realised that it would make more
sense to try and repair the old blue one and then wrap that one.
And
having learned my lesson on my first attempt at fibreglass repair that
you do NOT lay fibreglass on the outside as you will never get a decent
finish, I needed to lay lots of fibreglass on the inside of the nose
cone to provide structural strength, before using filler on the outside
which can be sanded down to get a decent finish. What is nice about
working on the inside of the cone is that it doesn't matter what it
looks like as it will never be seen. So did the first few cracks,
initially concentrating on the ones where the nose cone was actually
broken. Here are some photos of the result so far.


So the nose cone is now structurally sound. But there are still a couple of places where I need to add some more fibreglass, and I want to reinforce the mounting holes where the bolts were pulled through, and as I have plenty of resin and fibreglass I will add quite a bit more fibreglass to over-engineer it
So once that is all done it will be time to sand down the top surface and use filler to finish it off. Not sure how it will finish up, but if it is reasonable I may try painting it and see what it looks like. I can always wrap it if it looks scruffy.


So the nose cone is now structurally sound. But there are still a couple of places where I need to add some more fibreglass, and I want to reinforce the mounting holes where the bolts were pulled through, and as I have plenty of resin and fibreglass I will add quite a bit more fibreglass to over-engineer it
So once that is all done it will be time to sand down the top surface and use filler to finish it off. Not sure how it will finish up, but if it is reasonable I may try painting it and see what it looks like. I can always wrap it if it looks scruffy.
New Drip Tray
At long last the temperature in the garage won't give me hypothermia
so was able to get a session in. Now the new radiator is plumbed in I
topped up the cooling system and there is no static leak. I need to
check with the engine running to see if there is a leak under pressure,
so If it ever stops raining and I can get the car outside I will do
that.
You might recall I initially had a drip tray under the car, but it was trashed when I drove over it. After that I just left a towel underneath and chucked it away every few months. Not ideal, so decided it was time for a new tray.
 It's very deep-sided, so I chopped down the leading edge so I can slide
it under the sump (Still leaving enough to prevent overflow). And
screwed a handle to the back end to make sliding it in and out much
easier.
It's very deep-sided, so I chopped down the leading edge so I can slide
it under the sump (Still leaving enough to prevent overflow). And
screwed a handle to the back end to make sliding it in and out much
easier.
 And to make sure I don't run over it, another laminated
reminder sign is added.
And to make sure I don't run over it, another laminated
reminder sign is added.
You might recall I initially had a drip tray under the car, but it was trashed when I drove over it. After that I just left a towel underneath and chucked it away every few months. Not ideal, so decided it was time for a new tray.
 It's very deep-sided, so I chopped down the leading edge so I can slide
it under the sump (Still leaving enough to prevent overflow). And
screwed a handle to the back end to make sliding it in and out much
easier.
It's very deep-sided, so I chopped down the leading edge so I can slide
it under the sump (Still leaving enough to prevent overflow). And
screwed a handle to the back end to make sliding it in and out much
easier. 
Wednesday, 20 December 2017
New Radiator fitted
Have now installed a new radiator. Picked one up from Rimmer Bros sale, just £80 including P&P. Unfortunately it needed the hole for the thermostatic switch blocked up, which was another £20, but still a bargain.
Friday, 24 November 2017
Disaster
Bad day today. Although I did say I needed something to go wrong so I could work
on her. :-)
You probably remember when I leaned in and started the car when
she was in reverse and she ran back and bashed into my daughter-in-laws car. Well I just did it again, only this time she was in a
forward gear. I had just finished replacing the instrument panel
and wanted to see if all the electrics worked, including the rev
counter. So I waggled the gear lever to make sure she was in
neutral and started the engine. She wasn't in neutral so she
started and shot forward 6 feet and crashed into the work bench.
And just to really make my day, I had propped the bonnet up
against the work bench and she crashed into that :-( And then I saw
water gushing out of the bottom as well.............
So the damage is:

A 'flattened' bonnet


and a badly damaged radiator (both left and right at the
bottom). The bottom hose is supposed to come out horizontally but
it has been pushed vertically, breaking the joint.
And you can see the bottom mounting brackets for the nosecone have
folded back (They should be horizontal)
So far I've found a replacement radiator at a car place on the way to Lincoln for £85 (It's off a Rover SD1), so will probably get that.
So far I've found a replacement radiator at a car place on the way to Lincoln for £85 (It's off a Rover SD1), so will probably get that.
I will try gently bending the bonnet back in shape but may finish up taking it to a proper body shop, or even get a new one if Great British Sportcars have one in stock.
I have a spare nose cone in the spare bedroom, but it is yellow. So do I completely change over to yellow to match it, go multi-colour or spray paint it blue ?
The good news is that, apart from the radiator, it is all cosmetic. But she will be off the road for a few weeks I guess.
P.S. I pulled a muscle in my back as well :-)
Thursday, 23 November 2017
New Speedo Pinion
I've changed the speedo gear wheel to a 24-tooth one and now the speedo does not work. More work required.
Thursday, 16 November 2017
Battery Dead
Back from a great month-long holiday (Touring the West Coast of the
USA, Cayman Islands, Bahamas & then Washington DC) and settled back
in.
So got to the car and she was dead. And I mean totally dead, 0V showing on the voltmeter and nothing showing on a meter across the terminals of the battery. and it would not register on a charger. I knew the battery was on it's way out, but I have never seen one fail that comprehensively. Luckily (or forward planning ?) I had bought a new battery some weeks ago so out came the old one and in went the new one. All the lights came on and she started up instantly, even though she had been sat for a month.
I suspect I broke the battery myself by leaving it on a trickle charger when not in use over the last few months (not while we were away though as I wanted to see how the battery was looking). It was supposed to be a 'smart' charger, but I only ever saw it pushing it out 14V so I suspect it was continually overcharging the battery. It was a cheap one from Lidl, so I think I will just use it as a normal charger now and just charge the battery when it needs it.
So got to the car and she was dead. And I mean totally dead, 0V showing on the voltmeter and nothing showing on a meter across the terminals of the battery. and it would not register on a charger. I knew the battery was on it's way out, but I have never seen one fail that comprehensively. Luckily (or forward planning ?) I had bought a new battery some weeks ago so out came the old one and in went the new one. All the lights came on and she started up instantly, even though she had been sat for a month.
I suspect I broke the battery myself by leaving it on a trickle charger when not in use over the last few months (not while we were away though as I wanted to see how the battery was looking). It was supposed to be a 'smart' charger, but I only ever saw it pushing it out 14V so I suspect it was continually overcharging the battery. It was a cheap one from Lidl, so I think I will just use it as a normal charger now and just charge the battery when it needs it.
Monday, 9 October 2017
Speedo Working again
Having got a replacement cable from another Superspec owner I decided the only way to connect it to the gearbox was to put the car on a lift to give proper access. So it was round to my friendly mechanic and put her on his lift. Even then it was a bit of a struggle. But now it works.
 As expected, it is over reading drastically, almost 25% when I compare it with my GPS speedo.
 The reason for this is that the gearboxes were destined for the Ford Granada so were fitted with a 22-tooth speedo drive. It appears we actually need a 26-tooth drive (although some people tell me that 25 teeth is the most that Ford produced) to get the correct speed and these are practically unobtainable.
Just have to keep looking.


Just have to keep looking.
Tuesday, 12 September 2017
More Spare Parts
Drove to York and back
today with a friend who also has a Superspec and picked up some spare parts for our cars that we bought off a
chap who is changing the engine in his Superspec for a Mercedes V8
(Wow!!) .
 Here was the back of the Volvo when we got back :-)
Basically we picked up:
A complete Rover engine with only 2000 miles on it
Clutch
Gearbox
Adaptor Plate (Unobtainable now)
Alternator
Input Manifold
Throttle Body
Injector Rail
ECU
Starter Motor
Exhaust Manifold
Catalytic Converter and Silencer
Radiator Complete Engine Wiring Loom
Coolant bottle
The 3 Engine Mounts
Propshaft
Fuel Tank
Quick Shift Gear Mechanism
Water Pump
Power Steering Pump
Coolant Hose
(Originally we intended to have the differential and drive shafts as well, but it turned out they were off a disc brake version rather than our drum brake versions, so would not fit)
(And on the way I picked my replacement speedo cable from Mansfield)
I dread to think what these parts would normally have cost, and so many of them would be unobtainable anyway. The chap was going to put them on E-Bay and had originally estimated the total cost at well over £800. In the event he let us have it all for £500 (£250 each). Very pleased.
Just have to find somewhere to store it all. :-)

Basically we picked up:
A complete Rover engine with only 2000 miles on it
Clutch
Gearbox
Adaptor Plate (Unobtainable now)
Alternator
Input Manifold
Throttle Body
Injector Rail
ECU
Starter Motor
Exhaust Manifold
Catalytic Converter and Silencer
Radiator Complete Engine Wiring Loom
Coolant bottle
The 3 Engine Mounts
Propshaft
Fuel Tank
Quick Shift Gear Mechanism
Water Pump
Power Steering Pump
Coolant Hose
(Originally we intended to have the differential and drive shafts as well, but it turned out they were off a disc brake version rather than our drum brake versions, so would not fit)
(And on the way I picked my replacement speedo cable from Mansfield)
I dread to think what these parts would normally have cost, and so many of them would be unobtainable anyway. The chap was going to put them on E-Bay and had originally estimated the total cost at well over £800. In the event he let us have it all for £500 (£250 each). Very pleased.
Just have to find somewhere to store it all. :-)
Monday, 4 September 2017
New Exhaust Shield
The original heat shield was beginning to look a bit scruffy, and it was a bit of a misnomer as it wrapped tightly round the silencer so was actually at the same temperature. So time for a change.
 Here is the new heat shield fitted, and also an extra guard over the catalytic converter, as that was now exposed.
 Apart from looking very good, it also has all those holes and about 1" clearance from the silencer so the air flow keeps it relatively cool. Hopefully no more burnt legs.


Saturday, 2 September 2017
Tyres
When I replaced the tyres
a year ago the primary reason was their age (13 yrs+), although I
had noticed that the outside edge of the front nearside tyre had
quite a lot more wear than the rest of the tyres. This time my
mechanic pointed out a similar, almost imperceptible, wear pattern
on the new tyres, but this time on the outside edge of the front
offside tyre.
Neither of us could come up with a decent explanation. It can't be tracking as you would get the same wear pattern on both front tyres, and it can't be the inflation as you would then get the same wear on both sides of the tyres. I had wondered about camber, but that doesn't explain why it happened on the nearside tyre for the last set and the offside tyre for this set. I guess it's just a warped chassis (Robin Hood built the chassis without a jig, so it's not surprising)
Solution is pretty simple. Each year, just after the MOT I will swap tyres. So today I swapped the two front wheels. Next year I will shift the rear wheels to the front and year after that swap the front wheels again. Looking at the wear I think I can do at least 4 times before the wear becomes noticeable. So they should be good for 16 years.
Neither of us could come up with a decent explanation. It can't be tracking as you would get the same wear pattern on both front tyres, and it can't be the inflation as you would then get the same wear on both sides of the tyres. I had wondered about camber, but that doesn't explain why it happened on the nearside tyre for the last set and the offside tyre for this set. I guess it's just a warped chassis (Robin Hood built the chassis without a jig, so it's not surprising)
Solution is pretty simple. Each year, just after the MOT I will swap tyres. So today I swapped the two front wheels. Next year I will shift the rear wheels to the front and year after that swap the front wheels again. Looking at the wear I think I can do at least 4 times before the wear becomes noticeable. So they should be good for 16 years.
Cooling again
Back home from holiday so first day since the MOT I have had a chance to
check her out. The pleasure of getting through the MOT was
tempered a bit by the fact she overheated again on the way back
home. So first thing to do was check that.
Soon found out why
she overheated, she took 4 ltrs of water/antifreeze to fill up :-) My overflow bottle
was also full of water. So I emptied that back into the
expansion bottle and then took her on a 20 mile run out to see what happened. She behaved herself but the
temperature profile didn't seem to be 100% right. Back home I
checked and the overflow bottle had some water in again. Now she
shouldn't be overflowing at those temperatures so the first
suspect has to be the pressure cap on the expansion bottle. So
compliments of Amazon overnight, got a new cap this morning and
fitted it. Now need to see how she goes on the next trip.
Sunday, 20 August 2017
MOT and Preventive Maintenance
It's that time of year again. But I had checked everything I could find so I wasn't too surprised when she passed with noo advisories.
And while my trusted mechanic had here I asked him change the timing belt, as although the engine has done only 18,000 miles, she is over 20 years old now. And while he had the car I asked him to flush and replace the brake fluid as that probably hasn't been done since she was built. So with the usual oil & filter change and gearbox and diff level checks she is good to go for another year.
And while my trusted mechanic had here I asked him change the timing belt, as although the engine has done only 18,000 miles, she is over 20 years old now. And while he had the car I asked him to flush and replace the brake fluid as that probably hasn't been done since she was built. So with the usual oil & filter change and gearbox and diff level checks she is good to go for another year.
Tuesday, 15 August 2017
Cooling System again
Had a minor scare over the weekend.  The good old cooling system again

I hadn't put any water in for a couple of months but had noticed that my overflow bottle to the expansion bottle had an inch or so in it.   So that meant the pressure was exceeding 20psi and pushing the water out.   And I had noticed the fan was coming on a bit more than normal, but I had put that down to the hot weather. That's normally indicative of an air lock (trapped wind :-))  So I broke the golden rule of 'if it ain't broke don't fix it', I decided to try running the engine up to temperature with the cap off the expansion bottle so it would circulate better and not be under pressure.   To stop it pouring out I wrapped a cloth around a funnel and stuck that in the top of the expansion bottle. Started the engine, and as expected the water level rose and then sat about 1/3rd of the way up the funnel.   Once she was up to temperature I squeezed all the hoses, and some air was expelled.
But then a most odd thing happened.  The level in the funnel suddenly rose all the way to top.  I rushed around the car to stop the engine, but then it suddenly dropped all the way down to inside the bottle.   But then a few seconds later if rushed up again, so quickly that it actually spilt a little bit before I shut the engine down.  At this point I just added a little bit to bring the level in the expansion bottle up to it's normal level (about 3/4" below the top), put the cap back on and put her to bed.

Then my daughter's partner suggested we take her for a quick run to test if my lifting the back end had cured the exhaust mounting grounding.  So we drove to the Colsterworth roundabout (3.5 miles, 5 mins) and I flew her around that, forcing the passenger side down and success, no grounding.  But as we drove back I noticed the temperature gauge was on the 'A' of NORMAL and climbing, and the fan was on.  Now. normally she takes 20 mins to get to temperature so this was obviously worrying.   In fact the temperature carried on climbing and was just entering the red as we got back home.   What was a bit confusing was that when the fan comes on I normally feel a steady stream of warm air coming up through the footwell.   This time I could only just feel a bit of warmth.
We took the bonnet off and I expected the engine to be red hot, but oddly, I could rest my hand on it and it was not that hot.  And the top metal pipe was also not very hot.  But what had happened was that the overflow bottle was now full of boiling water.  (A an aside there was also water dripping down at the front of the car which was very scary until I realised it was actually coming off the overflow bottle and running down between the chassis tube and the body before finding a hole.)

So on the face of it it was simple problem in that the expansion bottle cap was not properly seated, so the water boiled over and was dumped into the overflow bottle, lowering the level and thereby heating the engine.  So I decanted the water back into the expansion bottle, made sure the cap was properly seated and repeated the run.  This time the temperature was under control although the fan was on permanently so it obviously wasn't perfect.

Thought about it overnight and hypothesised that the odd behaviour of the water when I was running with the cap on could have been caused by a long-standing air lock suddenly being released from deep within the engine and moving to the top of the engine.   And because the cap was not seated properly the level dropped so much that the temperature sensor was now in free air so went up into the red even though the engine itself was actually not that hot.    So I removed the top pipe from the radiator and added some water.  She took TWO LITRES  !!    So put everything back together.    Drove her 12 miles (20 mins) this morning and she appeared to be perfect.  But obviously I need a much longer journey to give her a proper test.
Monday, 7 August 2017
Alternator Problem
Interesting problem yesterday. It was such a nice day I thought I
would pop out for a drive. Got in the car, turned
on the ignition and noticed the alternator light didn't come on.
Started the engine and the voltmeter stayed fixed at 12V. So
obviously alternator was not working. Found the problem very quickly,
the warning light/exciter wire had snapped at the crimped joint at the
alternator So built a new crimped joint and soldered the wire onto the
existing one and everything worked as it should.
But from a philosophical point it was a bit poor. If I hadn't fitted the voltmeter and hadn't noticed the alternator light not working (easy to do in bright sunlight) then I would happily have driven off just on the battery. I assume everything would have ground to a halt after a few miles as the battery drained. The problem is that the alternator warning light assumes the wire is connected so it can sense when the alternator stops producing it's 14V and drops to 0V. So if the wire had snapped while driving I would be none the wiser.
It also proves that the alternator I have is not self-exciting and the warning light circuit is essential. Not surprising I guess based on it's age.
But from a philosophical point it was a bit poor. If I hadn't fitted the voltmeter and hadn't noticed the alternator light not working (easy to do in bright sunlight) then I would happily have driven off just on the battery. I assume everything would have ground to a halt after a few miles as the battery drained. The problem is that the alternator warning light assumes the wire is connected so it can sense when the alternator stops producing it's 14V and drops to 0V. So if the wire had snapped while driving I would be none the wiser.
It also proves that the alternator I have is not self-exciting and the warning light circuit is essential. Not surprising I guess based on it's age.
Monday, 24 July 2017
New Dashcam
My dashcam was showing it's age (and remember if cost only £14
a couple of years ago). It's always annoyed me that it didn't
overwrite when the SD card was full, it just stopped working. Also
the picture was always poor and now it is looking way over
exposed. So time for a new one and this time I went upmarket and
paid £20
It's a nice camera and it works correctly by overwriting old files when it is full. I put it in the same place on the windscreen and although the picture was OK, it showed every mark on the windscreen and the sun's reflection was very obvious.
 So I decided to
experiment with placing it in front of the windscreen instead.
So I decided to
experiment with placing it in front of the windscreen instead.
I'm not sure if the mount is good enough to withstand a 60mph wind, so we shall have to wait and see. Also the only way I could mount it there was upside down, so I have to rotate the video to watch it.
It's a nice camera and it works correctly by overwriting old files when it is full. I put it in the same place on the windscreen and although the picture was OK, it showed every mark on the windscreen and the sun's reflection was very obvious.

I'm not sure if the mount is good enough to withstand a 60mph wind, so we shall have to wait and see. Also the only way I could mount it there was upside down, so I have to rotate the video to watch it.
Reversing Camera
Since I have had the car I have hated reversing her as when strapped
in I just cannot turn round far enough to get a decent view. And
the mirrors are no good for short distances. The present warning
system I have works well enough, but you cannot beat a proper view
So time for technology to come to the rescue.
 I've had a reversing warning system on the shelf for a long time,
£20 on E-Bay as I recall. So first I mounted the camera at the
back:
I've had a reversing warning system on the shelf for a long time,
£20 on E-Bay as I recall. So first I mounted the camera at the
back:
 Then a screen on the scuttle:
 Which folds down when not in use. All wired in to the reverse switch so it only comes into use when
the ignition is on and reverse gear is selected.
Which folds down when not in use. All wired in to the reverse switch so it only comes into use when
the ignition is on and reverse gear is selected.


It works perfectly and I LOVE IT !!
Sunday, 23 July 2017
Rear Ride Height
Although my long term plan is still to replace the piece of angle iron from the rear exhaust mount, at the last kit car show I compared my rear ride height with another Superspec and found his was a good 1" higher. So today I lifted mine up another inch. Served it's purpose in that I can now go over the sleeping policemen in the next village without grounding.
Have to see how it has affected the overall ride and handling now.
Later: Drove fast round a roundabout with a passenger in and it was fine. So the exhaust mounting change not so important now.
Have to see how it has affected the overall ride and handling now.
Later: Drove fast round a roundabout with a passenger in and it was fine. So the exhaust mounting change not so important now.
Thursday, 13 July 2017
Lanbda Sensor Wiring Repair

Then took her to the garage and back. I knew immediately that the sensor was working as she shot off like a scalded cat. Had to work hard to stay below 60 mph.
Next thing I noticed was the temperature gauge started working. So it appeared to need rewiring after all even if it hadn't melted on the exhaust.
Finally, she behaved perfectly after the fuel stop, which historically is when the lambda sensor stopped working.
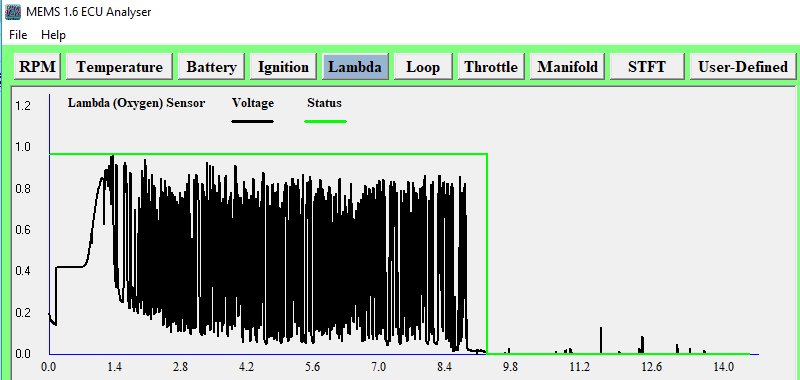
A quick check of the data stream showed:

The data from 0-1.4 mins was when I ran the engine in the garage to check the wiring. Start up time was less than a minute. 1.4 mins - 8.0 mins was the journey to the garage. The start up time was 1 min and she was good from then on. At the garage the start up time was only 30 secs and then she was on song again. I can see there was four sluggish areas for a few seconds on the way back but they were not noticeable in the car and certainly nothing like the drop outs I was getting before. Interestingly they were almost exactly a minute apart. How do we explain that ?
Later: Figured it out. They all coincided with me lifting my foot off the throttle. Turns out then when you do that the ECU stops the fuel completely so the engine slows down quickly. The lambda sensor senses a very lean mixture and drops to 0V. So it is working as it should.
Time to take a few days off I think. The fittings for the new heat shield come early next week so that is the next project.
Lambda Senor Rewire
For a long time now it has
been intermittent and I had the same symptoms with 3 different
sensors so the next suspect was the wiring. So I stripped it all
out and it wasn't good.
From where the 4 wires (2 x heater, earth and signal) exited the loom near the alternator they had just been bundled together with insulating tape, all red, and sent down to the sensor. What should happen is the signal wire and it's earth should be screened cable to avoid interference from the alternator and ignition. So out it all came, carefully labelled
I reused the 2 heater wires and made proper plug connections at the end so I can swap Lambda Sensors just by plugging and unplugging. Then I used some 2-core screened cable to go from just by the loom down to the sensor, again using proper plugs.
Started the engine (She has been on axle stands for 3 days), plugged in the laptop and watched. And no-one was more surprised than me when everything started working properly. So dropped her off the stands and took her out for a run. She went beautifully all the way to Colsterworth and back, very crisp and responsive, so I was very confident. However, when I checked the data I found this:


From where the 4 wires (2 x heater, earth and signal) exited the loom near the alternator they had just been bundled together with insulating tape, all red, and sent down to the sensor. What should happen is the signal wire and it's earth should be screened cable to avoid interference from the alternator and ignition. So out it all came, carefully labelled
I reused the 2 heater wires and made proper plug connections at the end so I can swap Lambda Sensors just by plugging and unplugging. Then I used some 2-core screened cable to go from just by the loom down to the sensor, again using proper plugs.
Started the engine (She has been on axle stands for 3 days), plugged in the laptop and watched. And no-one was more surprised than me when everything started working properly. So dropped her off the stands and took her out for a run. She went beautifully all the way to Colsterworth and back, very crisp and responsive, so I was very confident. However, when I checked the data I found this:
She she was working fine until the 9 min point then there was a
catastrophic failure. But the reason I hadn't noticed was that
the ECU had seen there was a problem and switched me into Limp Home
mode. So that was disappointing,
But at this stage I suddenly realised there was a nasty burning smell from somewhere and when I took the bonnet off the reason was obvious. Smoke was pouring off the exhaust. And this was the cause.
 Although I had carefully routed the wires away from the exhaust pipe
on initial assembly, when I had finished underneath there was a lot
of wire hanging down so I had pushed it upwards to secure with a
cable tie. That must have pushed the signal wire against the
exhaust pipe. Luckily I bought 2M of cable and used only half of
it, so it will be a simple job tomorrow to replace the wire.
Although I had carefully routed the wires away from the exhaust pipe
on initial assembly, when I had finished underneath there was a lot
of wire hanging down so I had pushed it upwards to secure with a
cable tie. That must have pushed the signal wire against the
exhaust pipe. Luckily I bought 2M of cable and used only half of
it, so it will be a simple job tomorrow to replace the wire.
But at this stage I suddenly realised there was a nasty burning smell from somewhere and when I took the bonnet off the reason was obvious. Smoke was pouring off the exhaust. And this was the cause.

Exhaust Heat Shield
Having discarded the old silencer heat shield I managed to pick a
new one up at the Baston Car Show off another member. I'm
waiting for some fittings to go on before I fit it, but I know
already it is shorter so will leave the catalytic converter
uncovered.
 So I made a second heat shield like the one Pete
made to cover the front of the pipes. Luckily he had left me a
spare piece. (And note the new black silencer - cool)
So I made a second heat shield like the one Pete
made to cover the front of the pipes. Luckily he had left me a
spare piece. (And note the new black silencer - cool)

New Oil Pressure Gauge
The replacement Oil Gauge & Sender arrived today so fitted
that. It turned out the Gauge was fine, it was the sensor that
had failed.

Friday, 7 July 2017
Leg Pad
A bit of a trivial thing, but ever since I have had the car I have
found the tunnel hard on my left leg. So decided it was time to
try a fix and added a pad.

Thursday, 6 July 2017
Oil Pressure Switch
A new oil pressure switch arrived this morning. I
had already decided to future-proof the system and bought one of
these:

It's a 3 way system, so you screw it into the engine where the
old sensor went and then you can screw in the new sensor and
also you can screw in a separate oil pressure sending unit for
when I get a standalone Oil Pressure Gauge.

To stop oil gushing out I have temporarily screwed the old
broken sensor in the top hole until I get the sender.
Interestingly, all the threads are tapered to make a good fit
when lightly tightened. It was designed so you didn't have to
use PTFE tape. But the new unit recommended you still use
PTFE tape, so I did. Result: Works perfectly, light
works as expected and no leak.
Minor Repairs
OVERFLOW BOTTLE - Ever since the original cooling
problems (2-3 yrs?) I have had an overflow bottle on my
expansion bottle
I wanted to see if any water was coming out of the pressure cap
on the expansion bottle. While Andy and I were comparing
engines at Baston I noticed it had fallen off. It had only
ever been jammed in the chassis so it wasn't totally surprising.

MEMS ANALYSER - As usual, I had plugged in my laptop to check the ECU on the journey to Baston but it just came up with an error message. So this morning I checked the wire and found part of it broken where I had used a very tight cable tie. So repaired that. Result: it worked perfectly.
Unlike the lambda sensor. Still no idea what is going on.

FAN WARNING LIGHT - Since I rewired the system the warning light didn't come on. It's rather a complex system as I have 3 ways the fan can be triggered (primary thermostatic switch in radiator (suspect), the secondary thermostatic switch in the top hose, and the fan override switch on the warning panel)
so I decided the simplest solution was wire the light in parallel with the fan, so regardless of how the fan is switched on the light will come on. The 'rats nest' gets worse, although at least I have labelled them this time Result: Works perfectly. Dropped in at the garage on the way home and as I left the fan came on for 2 mins and the light came on.

TEMPERATURE GAUGE NOT WORKING - I pulled the connection to the temperature sensor and then put it back. Result: Worked perfectly, must have vibrated loose.
INSULATION - The clutch rattle was so bad with the new MDF cover that I decided I needed some sound insulation.
Used a gash piece of carpet to do this. And the MDF cover sits on top. Result: Much quieter so it serves it's purpose. HOWEVER, the severe rattle & vibration at low speed is getting worse and worse. I think either the propshaft or drive shafts are on the way out. I think I better go underneath tomorrow just to make sure that everything is still tight and there are no loose bolts in the transmission.

Saturday, 1 July 2017
Revised Interior
Having finished the dashboard, I decided to replace
the gear lever surround with one made of MDF and covered with vinyl
so it matched the design of the dash. That looked good so I
thought I better do the same for the tunnel cover. But then I
realised I actually grab hold of that when I enter and leave the
car, and I also lean my elbow on it while driving. So an MDF based
one with sharp edges would be very uncomfortable. So I decided to
stick with the existing carpet covered stainless steel covered in
vinyl.
And I had some vinyl left over so just to really finish the interior off I decided to do the armrests as well.
 This what they used to
look like, black plastic and after 9 years beginning to look a bit
scruffy.
This what they used to
look like, black plastic and after 9 years beginning to look a bit
scruffy.
 So covered them with the spare vinyl:
And I had some vinyl left over so just to really finish the interior off I decided to do the armrests as well.


And the 'final' completed look is this.
Very pleased with the result.
Very pleased with the result.
Took her out for a run and she feels great. Also, for the first time in 4 years I can see the trip meter on the speedo (My viewing 'hole' on the cluster is larger than the original).
Subscribe to:
Posts (Atom)